sabato 26 maggio 2018

Shadow box card per Scrap & Craft DT...


Ciao a tutti e benvenuti!!! Oggi vi presento il mio progetto per il DT di Scrap & Craft ...una card contenente una Shadow Box.

Hello everyone! Today I am showing my latest project for Scrap & Craft DT... a Shadow Box Card.
If you want to follow the tutorial written in English then please head over HERE, on Scrap & Craft Inspiration Blog...thank you!

Iniziamo dalla shadow box...

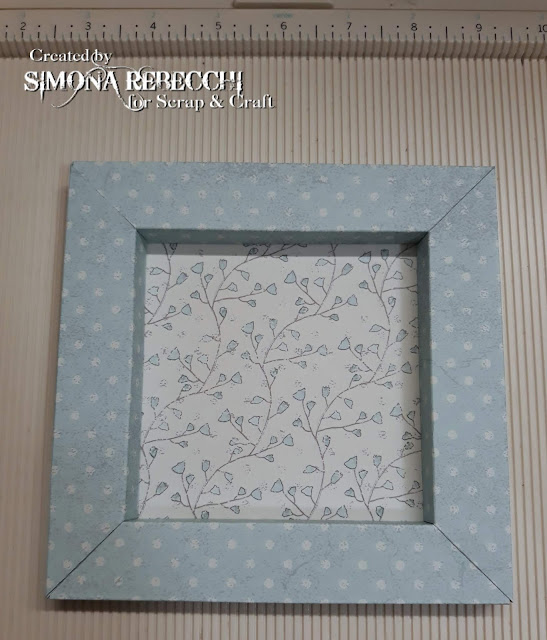
Prendere un foglio 12x12 pollici e fare le seguenti pieghe: a 1 – 1 ½ – 2 ½ – 3 pollici girare e fare la stessa cosa su tutti i lati. Poi fare un'altra piega a 4 pollici ed a 8, ma SOLO fino alla seconda linea delle pieghe fatte in precedenza (si lo so, sembra complicato ma non lo è, fidatevi...guardate la foto sotto per capire meglio). Questo procedimento va fatto solo su 2 lati opposti del foglio.


Per aiutarvi potete tracciare con una matita le linee da tagliare via...vedete foto sotto...
Questo passaggio va fatto per tutti e 4 gli angoli.


Segnate bene le pieghe con una pieghetta, aggiungete il nastro biadesivo ed iniziate ad incollare i lati, partendo da quelli più lunghi...


e voilà ...ecco la nostra Shadow Box.


Dal momento che ho scelto una carta patterned che mi piaceva particolarmente, non ho voluto coprirla, ma solo aggiungere qualche dettaglio all'interno...ho ritagliato dei fiori  e li ho incollati con del biadesivo spessorato, per dare più dimensionalità, ho aggiunto delle foglie fustellate da cartoncino bianco, del nastro di raso, delle mezze perle ed un sentiment timbrato su un ritaglio di carta patterned.


Per la card usare del cartoncino abbastanza spesso, tagliato a 6 ½ x 13 ½ pollici, e fare due pieghe a pollici  7 e 7 ½ .
Per tenere chiusa la card ho pensato ad una chiusura magnetica,  quindi tagliare una striscia di 3 ½ x 1 ¼ pollici e fare una  piega a 1 ½ e una a 2 pollici. Sulla parte interna incollare una calamita molto sottile ed incollarne una seconda sulla parte frontale della card, che verrà coperta dalla decorazione.

Per la facciata ho semplicemente ritagliato da un'altra carta patterned un quadrato di  6 ¼ x 6¼ pollici, fustellato delle etichette usando avanzi di carta e del cartoncino bianco, su cui ho timbrato un sentiment, poi ho aggiunto un nastrino di raso e delle mezze perle.

Non rimane che incollare la Shadow Box con del nastro biadesivo.


Una card speciale per una persona speciale...

Materiale dallo Store di SCRAP & CRAFT :

Craft O' Clock 'Morning Dreams II' 12x12 paper pad
Bambino glue 45 gr. tube

Grazie per essere passati di qua...ci vediamo alla prossima!

Kisses&Hugs!
Simo.
mercoledì 23 maggio 2018

This is ME...


Ciao a tutti e bentornati! Come ogni settimana...o quasi...è arrivato il momento di farvi vedere cosa ho preparato per partecipare alla sfida..o come in questo caso alle sfide di SIMON SAYS STAMP...
La richiesta della SFIDA DEL LUNEDI' era di lasciarsi ispirare da una canzone ( 'INSPIRED BY A SONG'), mentre quella DEL MERCOLEDI' è di usare più di 1 timbro ('USE MORE THAN ONE STAMP').

Hello and welcome back! Like every week...or so...it's  time to show you what I have created to submit to the Challenge or, in this case, Challenges over on SIMON SAYS STAMPS Blogs...
The MONDAY Challenge requested to be 'INSPIRED BY A SONG', while the WEDNESDAY Challenge asks you to 'USE MORE THAN ONE STAMP'.


Per la prima Sfida devo dire che ho avuto parecchi dubbi...che canzone scegliere tra le mille mila che mi piacciono? Credetemi ho passato in rassegna quasi tutte le canzoni della mia giovinezza...ho sognato sulle note di 'SAVE A PRAYER' dei DURAN DURAN...ho ballato ascoltando 'FREEDOM 90' (e capendone finalmente il testo...) e mi sono commossa con 'CARELESS WHISPERS' di GEORGE MICHAEL...ho riguardato il video di 'YOU MADE ME THE THIEF OF YOUR HEART' di SINEAD O'CONNOR...la scelta era sempre più difficile...poi mi sono ricordata di uno special visto da mia sorella sul Making of di 'THE GREATEST SHOWMAN'...cioè la canzone 'THIS IS ME' cantata dalla bravissima KEALA SETTLE...
'I AM BRAVE, I AM BRUISED, I AM WHO I'M MEANT TO BE....THIS IS ME'
('SONO CORAGGIOSA, HO DELLE FERITE, SONO CHI DOVEVO ESSERE...QUESTA SONO IO')

For the first Challenge I have to say that I struggled a lot...which song to choose, of the many I love? Believe me...I have listened to a lot of songs from my youth...dreaming on the music of  'SAVE A PRAYER' by DURAN DURAN...dancing listening 'FREEDOM 90' (and finally understanding the lyrics) and being moved by 'CARELESS WHISPERS' by GEORGE MICHAEL...watched again the video of 'YOU MADE ME THE THIEF OF YOUR HEART' by SINEAD O'CONNOR...the choice was harder than ever...then I remembered a special watched at my Sister's, about the Making of 'THE GREATEST SHOWMAN'...and the song was 'THIS IS ME' sung by the amazing KEALA SETTLE...
'I AM BRAVE, I AM BRUISED, I AM WHO I'M MEANT TO BE...THIS IS ME'


A chi non è capitato di sentirsi inadeguata, insicura...non abbastanza brava...beh a me di certo è capitato e qualche volta capita ancora...ma il punto è proprio questo...abbracciare ed accettare ciò che si è, credere nei propri sogni e dare il meglio...QUESTA SONO IO!

Who never felt, at least once, imperfect, unsure...not good enough...well sure it happened to me, and still does, from time to time...but the point is to learn to embrace imperfections, accept ourselves, believe in our dreams and  give our best...THIS IS ME!


Per la seconda sfida sono stata decisamente fortunata...infatti per questo progetto ho usato 5 timbri diversi...L'omino che cammina sulla corda e la frase sono dal set 'Theories' di Stampers Anonymous/Tim Holtz, mentre la mano timbrata su una Polaroid bruciata (Ebbene si...regalo della mia sorellina) ed i pennelli vengono da due dei miei set preferiti di AALL & Create, rispettivamente il #28 ed il #39 entrambi della bravissima Bipasha BK.

For the second Challenge I just got  lucky...for this project I have used 5 different stamps...The man of the rope and the phrase are from 'Theories' set by Stampers Anonymous/Tim Holtz, while the hand, stamped on a blackened Polaroid (you got that right...my Sister gave it me) and brushes are from two of my favourite sets by AALL & Create, #28 and #39, created by the very talented Bipasha BK.

Ho usato come base 2 fogli 6"x6" della 7 Dots Studio - Paint Chips designer pad...la carta è talmente bella che ho solo distressato i bordi, timbrato, aggiunto uno sticker 'Small Talk' di Tim Holtz, una cucitura fatta a macchina ed incollato i vari pezzi. Questo diventerà una pagina nel mio Art Journal.

As a base I have used two 6"x6" sheets from 'Paint Chips designer pad' by 7 Dots Studio...this paper is so beautiful that I just distressed the edges, stamped, added a 'Small Talk' sticker, added stiches with my sewing machine and then glue the other pieces. This will become a page in my Art Journal..

Partecipo alle seguenti sfide / I submit it to the following Challenges:

- SIMON SAYS STAMP MONDAY CHALLENGE BLOG - INSPIRED BY A SONG

- SIMON SAYS STAMP WEDNESDAY CHALLENGE BLOG - USE MORE THAN ONE STAMP

E questo è tutto...Siate sempre voi stessi...alla prossima!

This is it...Be always yourselves...see you next time!

Kisses&Hugs!
Simo


Let the show begin...


mercoledì 16 maggio 2018

Let's STENCIL...


Ciao a tutti e bentornati! Oggi voglio mostrarvi una Tag in stile Steampunk...
Quando hai delle amiche di talento che creano Stencils...e Simon dice 'Stencil it'...metà del lavoro è praticamente fatto!
Per questo progetto ho utilizzato gli stencils della linea 'Crazy Girls Stencil'  distribuiti da Piccole Passioni, 'Geometric Doodle' di La Sab Design (creato da Sabrina Perna)  e 'Romantic Steampunk' di Terelisa Design (creato da Terelisa Agosti).

Hello everyone and welcome back! Today I will show you a Steampunk Tag...
When you have talented friends who create stencils...and Simon Says 'Stencil it' well...half work is already done!
For this project I have used Stencils from 'Crazy Girls Stencil' line, distributed by Piccole Passioni,
 'Geometric Doodle' by La Sab Design (created by  Sabrina Perna)  and  'Romantic Steampunk' by Terelisa Design (created by  Terelisa Agosti).

Trovate un elenco dei materiali usati alla fine del post...
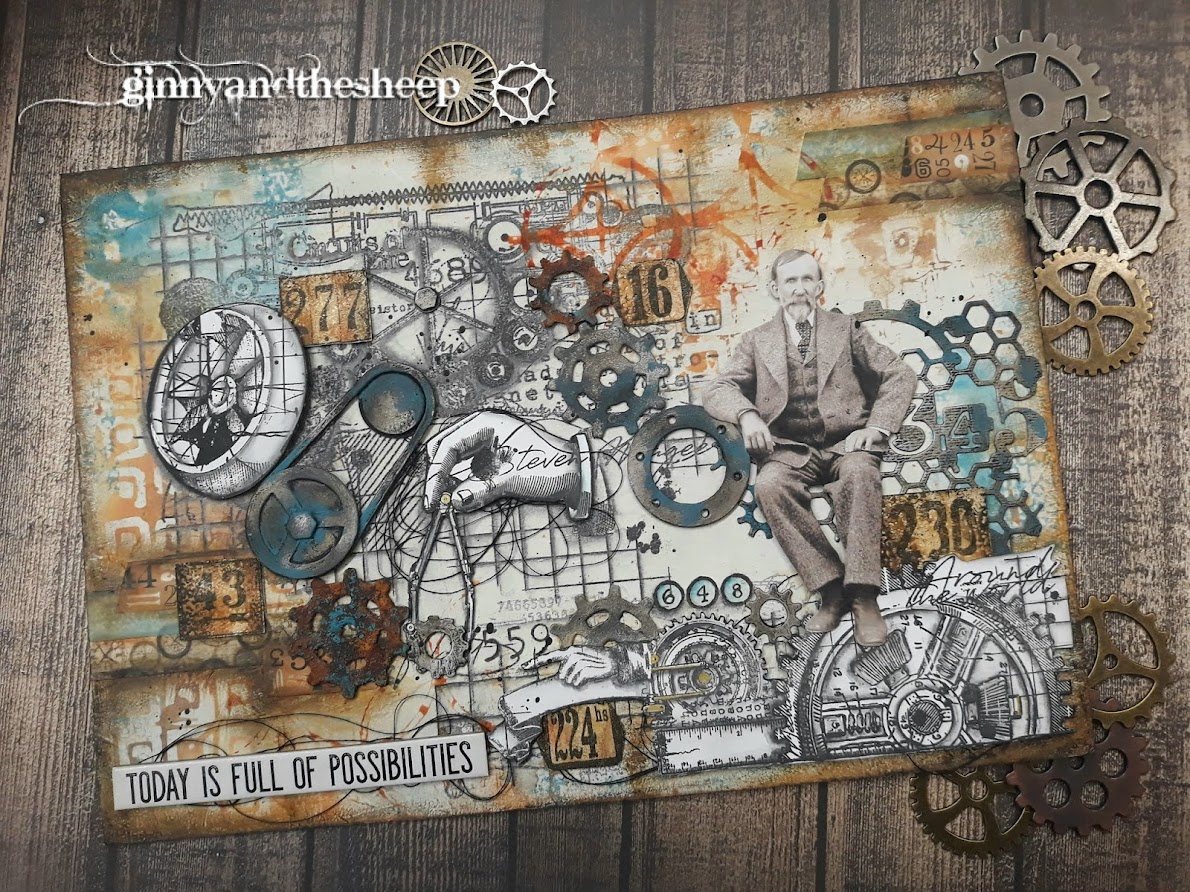
Ho usato del cartoncino per acquerello per questa Tag...ho usato lo stencil 'Geometric Doodle' ed il Distress Oxide ink pad 'Walnut Stain' poi, dopo averlo pulito, ho girato lo stencil sul retro e ci ho spruzzato su il Distress Resist Spray. Prima che asciugasse del tutto ho fatto cadere un po' di polvere per embossing Distress Vintage Photo, che ha creato delle macchie come di ruggine. Ho aggiunto della Modeling Paste usando lo stencil 'Romantic Steampunk' (la parte con gli ingranaggi ed i fiorellini) ed ho asciugato bene.
Ho aggiunto i colori 'spatasciando' direttamente gli Oxides sul Craft Sheet, spruzzandoli con acqua e passandoci dentro la Tag.
Di solito uso il Gesso come base per i miei lavori...questa volta invece non l'ho usato e devo dire che l'ossidazione dei colori è venuta spettacolare...


You will find the full list of supplies at the end of this post...
I have used watercolour cardstock for this Tag...started using 'Geometric Doodle' stencil with Distress Oxide ink Walnut Stain. Then, after cleaning the stencil I just reverse it and sprayed Distress Resist Spray onto the tag...before it was completely dry I sprinkled Distress embossing powder Vintage Photo, that created some beautiful rusty spots. Added Modeling Paste through 'Romantic Steampunk' stencil, using the design with gears and tiny flowers, and let dry.
Added colours 'smooshing' the Distress Oxide ink pads on the Craft Sheet, spritzing  with water and tapping the Tag into them.
I usually Gesso the substrates for my projects...not this time and I must say that the oxidation of the colours turned out amazing...


Ho scurito i bordi ed aggiunto qualche timbrata qua e là...

Darkened the edges and added more interest with a stamp...


Per completare il tutto ho aggiunto vari abbellimenti...del washi tape, filo, ingranaggi di metallo, una Paper Doll, un paio di stickers ed un bel nastrino.

To finish it off I added few embellishments...some washi tape, thread, metallic gears, a Paper Doll, a couple of stickers and a lovely ribbon.

Ecco i dettagli...
Here's  more details...


Lista dei materiali / Supplies list:

- Sizzix/Tim Holtz Alterations Framelits dies 'Tag Collection' set
- Cartoncino per acquerello / Watercolour cardstock
- 'Crazy Girls Stencil' Geometric Doodle stencil by La Sab Design
- 'Crazy Girls Stencil' Romantic Steampunk stencil by Terelisa Design
- Ranger Distress Oxide Inks: Walnut Stain, Antique Linen, Frayed Burlap, Vintage Photo, Peacock
  Feathers
- Ranger Distress Mini Inks: Rusty Hinge, Black Soot
- Ranger Distress Crayons: Black Soot, Antiqued Bronze
- Ranger Distress Resist Spray
- Ranger Mini Distress Archival Ink Black Soot
- Ranger Mini Blending Tool
- Ranger Non-Stick Craft Sheet
- Stampers Anonymous/Tim Holtz Collection 'Dapper' stamp set
- Advantus Corp/Tim Holtz Idea-ology Paper Dolls
- Advantus Corp/Tim Holtz Idea-ology Clippings Stickers
- Advantus Corp/Tim Holtz Idea-ology 'French' Design Tape
- Filo nero/Black Thread
- Ingranaggi di metallo/Metallic gears
- Nastro/Ribbon

Con questa Tag partecipo alle seguenti sfide...
I submit this Tag to the following Challenges...

- SIMON SAYS STAMP MONDAY CHALLENGE: STENCIL IT

- SIMON SAYS STAMP WEDNESDAY CHALLENGE: STENCIL IT

- SANDEE & AMELIE'S STEAMPUNK CHALLENGES: ANYTHING GOES - 
  STEAMPUNK/INDUSTRIAL

Con questo è tutto...grazie per essere passati di qua! Ci vediamo alla prossima!

That's all...thanks so much for stopping by! See you next time!

Kisses&Hugs!
Simo.


EDIT:
Sono felicissima di aver VINTO il magnifico premio messo in palio dalla DecoArt, per la Sfida di Maggio di SANDEE & AMELIE'S STEAMPUNK CHALLENGE BLOG con questa Tag!

I am sooooo happy to be the winner of this amazing prize by DecoArt, for the May Challenge over at SANDEE & AMELIE'S STEAMPUNK CHALLENGE BLOG, thanks to this Tag!


domenica 13 maggio 2018

MEMORIES...


Ciao a tutti, buona Domenica e buona Festa della Mamma!
Oggi vi presento il mio nuovo progetto per il DT di MarteLAB, dedicato ad una mamma speciale...la mia nonna materna...QUI sul Blog di MarteLAB  potrete trovare il tutorial in Italiano... qui sotto, invece proporrò il tutorial in inglese.

Hello my friends happy Sunday and Happy Mother's Day!
I have made a Mixed Media Layout for MarteLAB DT, and I have decided to dedicate it to a very special Mom...my Grandmother! Unfortunately I have never met her, but I have come to know her a bit through my Mother's memories, and with this LO I wanted to celebrate them both.

I have glued together  three sheets of designer paper and distressed them with my scissors. Applied Clear Gesso and then a very thinned layer of White Gesso, tied some string across the middle then added Modeling Paste through two Tim Holtz Layering Stencils - one is from Mini Set #24 and the other is 'Roses'. While the paste was still wet I added some lace, adding also Prima/Finnabair Soft Matte Gel, then let dry. To add colour I have used PaperArtsy Infusions 'Frankly Scarlet' and 'Terracotta',  TommyArt Ink Extreme 'Bordeaux'  then Lindy's Gang Starburst 'Hottie Patottie Hot Pink' , Moon Shadow Mists 'Violaceous Violet' and 'Phantom Fuchsia'. Once dry I used the 'second generation' stamping technique with Black Archival Ink and Prima/Finnabair 'Messy' stamp. I spattered with the inks, adding also some white ink drops.


I have then built my composition using leftover papers, more lace and thread, added my GrandMother's picture, that I have 'aged' using Distress Inks, a frame die cut with 'Ornate Frame #2' BIGZ Die by Sizzix/Tim Holtz Alterations and a chipboard word... I have covered these two pieces with Heavy Black Gesso then added touches of Metallique Waxes 'Old Silver' and 'Vintage Gold', all by Prima/Finnabair, then some Prima flowers that I have sprayed with the inks mentionned before.


I submit this project to the following Challenge:

MORE THAN WORDS MAY 2018 CHALLENGE: MEMORIES & FRAME
All this project is about MEMORIES...of my childhood when my Mum used to share cherished memories about her own Mother, of my heritage, discovering traits and similarities in old pictures kept in a drawer...of my Mum, who is always in my thoughts...Happy Mother's Day!

Thank you for stopping by...See you next time!

Kisses&Hugs!
Simo.

giovedì 10 maggio 2018

HAPPY LITTLE STAMPERS MAY ATC CHALLENGE: GOLD!


Ciao a tutti e bentornati! Oggi vi parlo della sfida delle ATC sul Blog di HAPPY LITTLE STAMPERS...Il tema di Maggio è GOLD...

Hello and welcome back! Today I'm introducing to you the May ATC Challenge over at the HAPPY LITTLE STAMPERS Blog..the new theme is GOLD..


Il vincitore di questa sfida riceverà un coupon di $20 da spendere nello SHOP! Potete trovare tutti i dettagli QUI.

Our winner for this challenge will receive a $20 coupon to spend at the SHOP! Check out all the details HERE.


'Non tutto quel ch'è oro brilla,
Né gli erranti sono perduti;
Il vecchio ch'è forte non s'aggrinza,
Le radici profonde non gelano.
Dalle ceneri rinascerà un fuoco,
L'ombra sprigionerà una scintilla;
Nuova sarà la lama ora rotta,
E re quel ch'è senza corona'
'All that is gold does not glitter,
Not all those wander are lost;
The old that is strong does not wither,
Deep roots are not reached by the frost.
From the ashes a fire shall be woken,
A light from the shadows shall spring;
Renewed shall be blade that was broken,
The crownless again shall be king.'

JRR Tolkien – La compagnia dell'anello – The fellowship of the ring

Per queste ATC ho inaugurato il Distress Resist Spray che ho spruzzato su cartoncino Kraft, poi ho versato della polvere per embossing oro, tolto l'eccesso ed embossato. Mi piace tantissimo questo effetto...Ho aggiunto altri tocchi 'dorati' usando la cera Metallique Vintage Gold di Prima/Finnabair e lo Splash Ink Gold della 13Arts, ed anche se si notano appena, danno comunque più interesse allo sfondo, infine tagliato a misura, cioè 2,5x3,5 pollici.

For these ATCs I finally got to play with my Distress Resist Spray, used onto kraft cardstock then covered with gold embossing powder, shook off the excess and embossed. I really love this effect...Added other 'gilded' touches using Vintage Gold Metallique Wax by Prima/Finnabair and Gold Splash Ink by 13Arts, and even if  you can barely see them, they add more interest to the background, then cut to size the ATCs (that is 2,5x3,5 inches)


Ho poi incollato i vari elementi: fustellate di ingranaggi coperte con Gesso nero e poi con la Metallique Wax, del filo nero, delle dolcissime Paper Dolls di Tim Holtz e la bellissima frase di Tolkien, che ho stampato su cartoncino. 

Then added all the embellishments: die cut gears covered in Black Gesso then highlighted with the Metallique Wax, black thread, lovely tiny Tim Holtz' Paper Dolls and that beautiful quote from Tolkien, that I stamped onto heavy cardstock.

Ecco nel dettaglio....Here the close-ups...


E' tutto per oggi... ora tocca a voi creare le vostre ATC e postarle sul BLOG di HAPPY LITTLE STAMPERS, per avere l'opportunità di vincere il coupon per lo SHOP.

That's it for today...now it's your turn to create your ATCs and share them on the HAPPY LITTLE STAMPERS BLOG, for the chance to be the winner of the coupon for the SHOP.

Presento queste ATC per la seguente sfida / I submit these  ATCs to the following challenge:


Grazie per essere passati....Ci vediamo alla prossima!

Thank you for stopping by...See you next time!

Kisses&Hugs!
Simo.

martedì 8 maggio 2018

A Journey to the Past...


Ciao a tutti e benvenuti! Oggi volevo farvi vedere una Tag preparata qualche tempo fa per una DT call, ma mai pubblicata...Dal momento che nella nuova sfida del Lunedì sul Blog di SIMON SAYS STAMP...si parla di effetto Ombré, mi sembra giunto il momento giusto per questo mini tutorial...
Con il termine OMBRE si intende quell'effetto sfumato che passa da una tonalità scura ad una più chiara.

Hello everyone and welcome! Today I wanted to show you a Tag made some time ago fo a DT call, bu never published before...As in the new challenge over at SIMON SAYS STAMP MONDAY CHALLENGE Blog they are talking about Ombré I thought it was just perfect for this mini tutorial...
The term OMBRE  is used to explain that 'shaded' effect when a colour fades into another, usually from a dark value to a lighter one.


Ho usato cartoncino pesante per acquerello e cartone di recupero per dare maggior resistenza. Ho coperto con gesso bianco, poi ho incollato il Tissue Wrap 'Postale' di Tim Holtz, con il Soft Matte Gel di Prima/Finnabair, in modo molto irregolare, creando delle grinze per accentuare la texture. 

I have used heavy weight cardstock and recycled cardboard for added sturdiness. Covered with White gesso, then glued Tim Holtz Tissue Wrap 'Postale' using Soft Matte Gel by Prima/Finnabair, in a very uneven way, to create more texture.


Ho steso con la spatola qua e là della Crackle Texture Paste della Ranger e fatto asciugare. Poi ho aggiunto della Modeling Paste con lo stencil 'Roses' di Tim Holtz

Using a palette knife I added here and there some Crackle Texture Paste by Ranger and let air dry, then added Modeling Paste through Tim Holtz 'Roses' Layering Stencil.


Ho incollato i vari elementi, tipo fustellate, chipboards, ingranaggi, fiori di carta e poi coperto con Gesso bianco. Una volta asciutto ho iniziato a spruzzare con InkExtreme 'Smeraldo' di Tommy Art ed acqua, iniziando dal basso dove volevo la maggior concentrazione di colore, e cercando di sfumare verso l'alto, inoltre ho aggiunto anche qualche tocco di Rainbow Color Duo Navy Blue di 13Arts, per scurire di più il fondo. Ho poi aggiunto qualche tocco di Rust Paste di Prima/Finnabair e scurito i bordi con il Distress Crayon Black Soot. Nella parte alta ho schiarito un po' con qualche tocco di Gesso bianco...e l'Ombre effect è fatto.

Glued all the elements, such as die cuts, chipboards, gears, paper flowers and covered again with white gesso, and when it was dry I started to spritz with 'Emerald' Ink Extreme by Tommy Art, together with water, starting from the bottom where I wanted my colour more strong, and going for a softer look for the top. Added also few touches of  'Navy Blue' Rainbow Color Duo Watercolour Powder by 13Arts, to darken the bottom a bit. Here and there I added also a few touches of Prima/Finnabair Rust paste, then darkened the edges with Distress Crayon Black Soot. On the top I highlighted with few touches of White Gesso, and the Ombre effect is done.


 Ho incollato altri abbellimenti, tra cui fustellate 'invecchiate' con la Rust Paste, e poi ho aggiunto qualche tocco di Metallique Wax Vintage Gold di Prima/Finnabair.
Per finire, una Quote Chip ed una Paper Doll di Tim Holtz, un charm di metallo ed un nastro di raso a completare il tutto.

Added other embellishments, as die cuts from 'Gadget Gears #2'  and 'Weathered Clock' BIGZ Dies by Sizzix/Tim Holt Alterations, all aged with the Rust Paste, few metal gears, then had fun with Metallique Wax 'Vintage Gold' by Prima/Finnabair.
As final touches, a Quote Chip and a Paper Doll by Tim Holtz, a metal charm and a satin ribbon.


Presento questa Tag per le seguenti sfide/I enter this Tag to the following Challenges

SIMON SAYS STAMP MONDAY CHALLENGE BLOG: OMBRE


SANDEE & AMELIE'S STEAMPUNK CHALLENGES BLOG: ANYTHING GOES - STEAMPUNK/INDUSTRIAL

Grazie per essere passati di qua...spero di vi sia piaciuto il progetto! Ci vediamo alla prossima...

Thanks for stopping by...hope you enjoyed this project! See you next time...

Kisses&Hugs!
Simo.


venerdì 4 maggio 2018

IMAGINE...


Ciao a tutti e benvenuti! Oggi volevo mostrarvi quello che ho preparato per la nuova sfida mensile sul Blog di Scrap & Craft Inspiration

Hello everyone and welcome back! Today I want to show you what I have created for the new Monthly Challenge over at Scrap & Craft Inspiration Blog
Come potete vedere la sfida consiste nell'usare 3 chipboards nel vostro progetto, oltre ad almeno un prodotto acquistato nello Store di SCRAP & CRAFT (e questo prodotto andrà linkato allo Shop)
QUI  trovate le regole del Challenge...

As you can see, the Challenge consist in using 3 chipboards in your project, plus at least 1 product bought from SCRAP & CRAFT Store  (and that must be linked back to the Store itself)
HERE  you will find the Challenge rules...


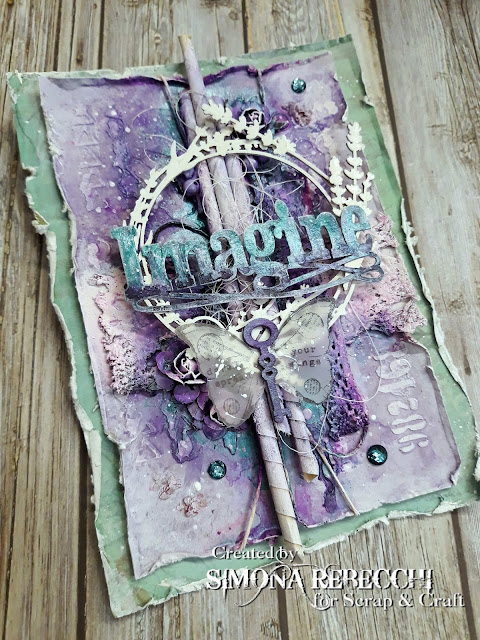
Per questa card ho usato 2 fogli dalla collezione THE BERRY COPSE di Studio75...adoro il contrasto tra il verde ed il viola..ho steso prima del Clear Gesso su entrambi, poi qualche tocco di Gesso bianco. Ho rovinato i bordi con le forbici e poi li ho ripassati con il gesso bianco. Sulla carta viola ho usato lo stencil #6 di AALL & CREATE con la modeling paste ed aggiunto qualche giro di spago per creare più texture. Ho incollato anche dei pezzi di pizzo con il Soft Matte Gel di Finnabair/Prima, dei fiori di carta e delle 'cannucce' create con pagine di libro, poi spruzzato con Ayeeda Mist Pastel Lavender della 13Arts, con Starburst Prima Donna Purple e Witch's Potion Purple della Lindy's ed infine aggiunto dei tocchi di Metallique Mermaid Tail Acrylic Paint di Finnabair/Prima, che sembra fatto apposta per essere usato con il Witch's Potion della Lindy's...ho incollato il bellissimo set di chipboards 'LAVENDER MIST - FRAME 02' di Scrapiniec  che ho coperto con gesso bianco e poi con dei tocchi di Metallique White Pearl Acrylic Paint di Finnabair/Prima, del filo bianco, la scritta Imagine che ho spruzzato con i Lindy's ed accentuato con il Metallique Mermaid Tail, una farfalla timbrata su vellum ed una chiave anch'essa spruzzata con i Lindy's. Ho poi fatto cadere delle gocce di ink bianco e come tocco finale ho aggiunto dei cristalli dal set 'Saint Tropez' della Prima.

For this card I have used 2 sheets from THE BERRY COPSE 12X12 paper set by Studio75...I love the contrast between purple and green..I covered both with Clear Gesso, then added few touches of white gesso, distressed the edges with scissors and painted them with white gesso. On the lavender paper I glued some lace, paper flowers and straws made with book pages using Soft Matte Gel by Finnabair/Prima, then sprayed with the following colours: Ayeeda Mist Pastel Lavender by 13Arts, Starburst Prima Donna Purple and  Witch's Potion Purple by Lindy's and last added few touches of Metallique Mermaid Tail Acrylic Paint by Finnabair/Prima, that  is so perfect used with the Witch's Potion Purple...I glued the beautiful chipboard set 'LAVENDER MIST - FRAME 02' by Scrapiniec, that I covered with White gesso, then with a dash of Metallique White Pearl Acrylic Paint by Finnabair/Prima, added white thread, the word Imagine that I sprayed with Lindy's then enhanced with Metallique Mermaid Tail, a butterfly stamped on vellum and a key, also sprayed with Lindy's mists. Spattered with white ink and added crystals from 'Saint Tropez' set by Prima, as final touches.


Con questo progetto partecipo alla seguente sfida/ I submit this project to the following challenge:

- MIXED MEDIA PLACE: APRIL CHALLENGE


Non è stato difficile farsi ispirare da questi bellissimi colori, dalle parole e  dalla tranquillità che emana da questa moodboard...Dobbiamo solo usare la nostra Immaginazione, per superare i limiti che ci autoimponiamo...

It was not hard at all to be inspired by those beautiful colours, the words and the serenity of this Moodboard...We just need to use our Imagination to overcome those limits that we create by ourselves...

Grazie per essere passati...ci vediamo alla prossima!

Thanks for stopping by...see you next time!

Kisses&Hugs!
Simo.

EDIT: So happy the card has been featured, among amazing projects, on MIXED MEDIA PLACE BLOG!