mercoledì 25 aprile 2018

Simon says...Flower Power!


Ciao a tutti! Vi è mai venuta voglia di 'spatasciare' colori ovunque senza nessun piano preciso, così...giusto per divertirvi? Ecco, se uniamo questa voglia con il tema della sfida di questa settimana di SIMON SAYS STAMP MONDAY CHALLENGE Blog, cioè FLOWER POWER, avrete una Tag super colorata e psichedelica...insomma il mio personale Inno alla Gioia!

Hello everyone! Have you ever wanted to splash colours around just for fun, without having any plan in mind? Well, mix it with this week's theme over at SIMON SAYS STAMP MONDAY CHALLENGE BLOG, that is FLOWER POWER, and you will get a very coloured and psychedelic Tag...my very personal Ode to Joy!

Trovate la lista materiali alla fine del post..
You will find the full list of supplies at the end of this post...


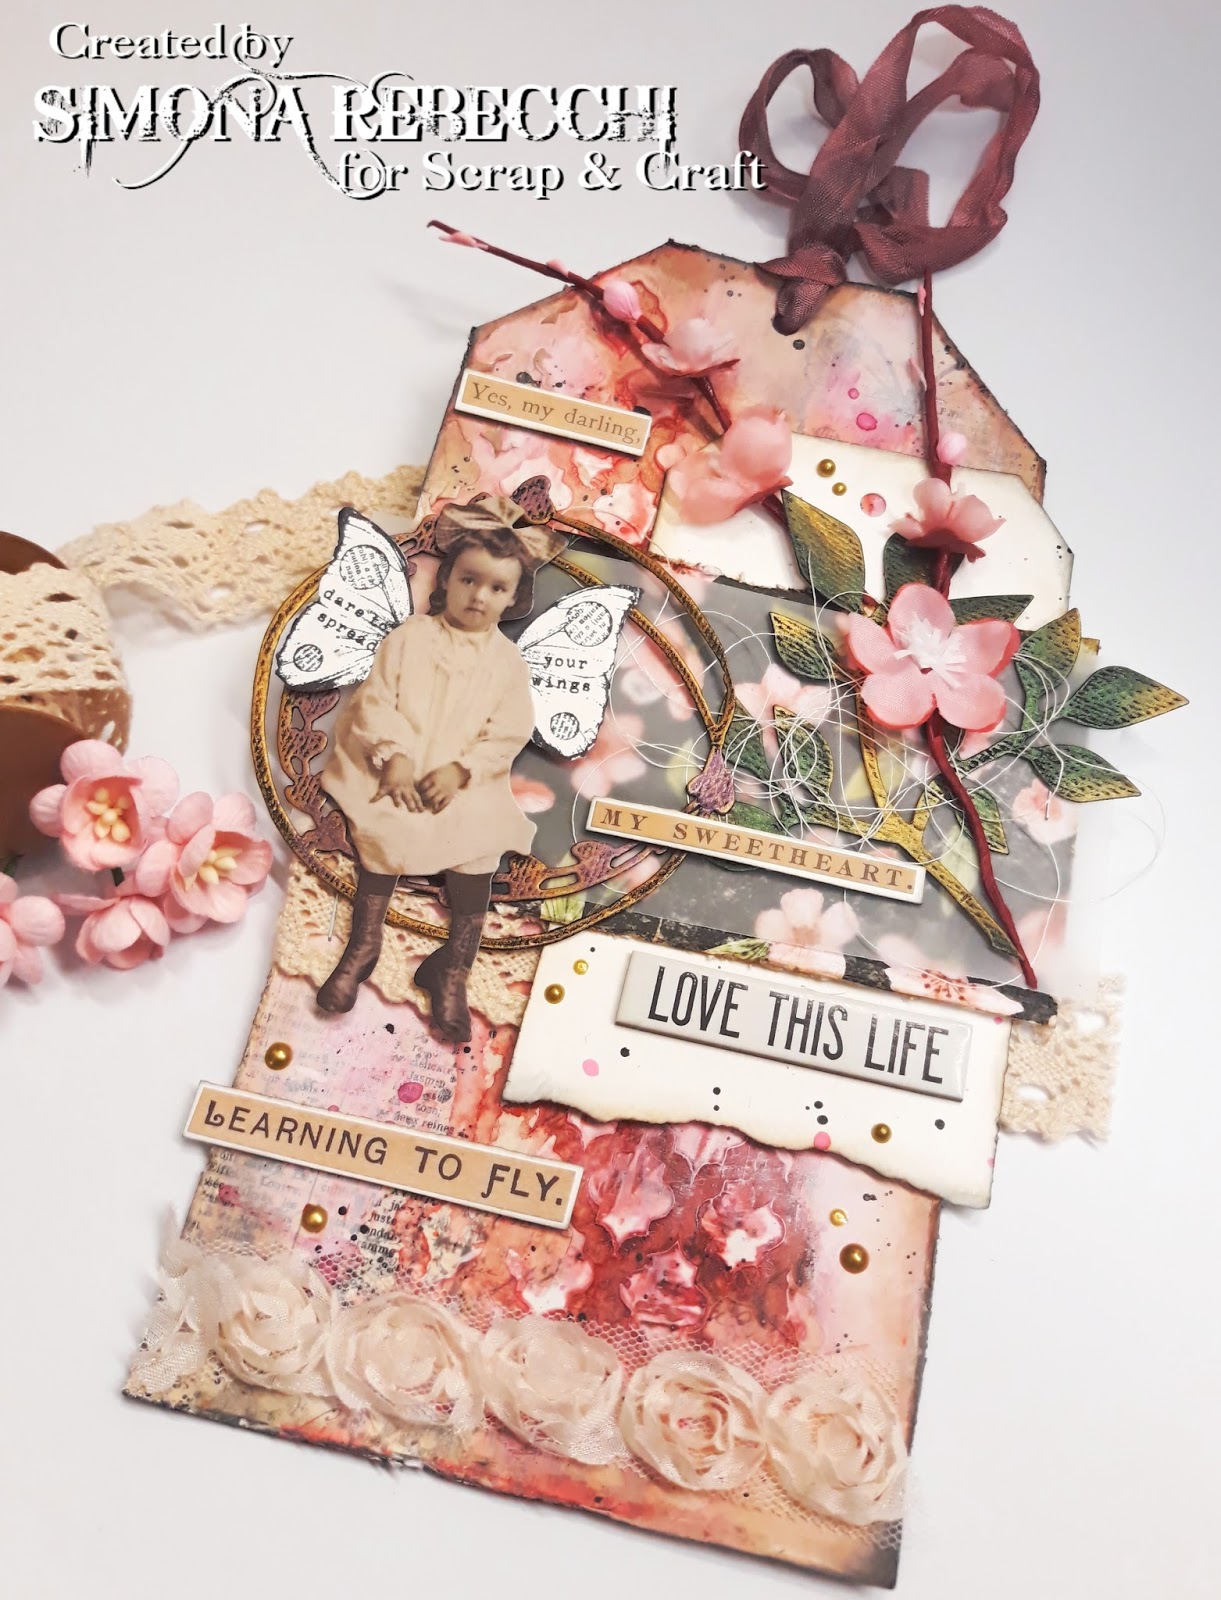
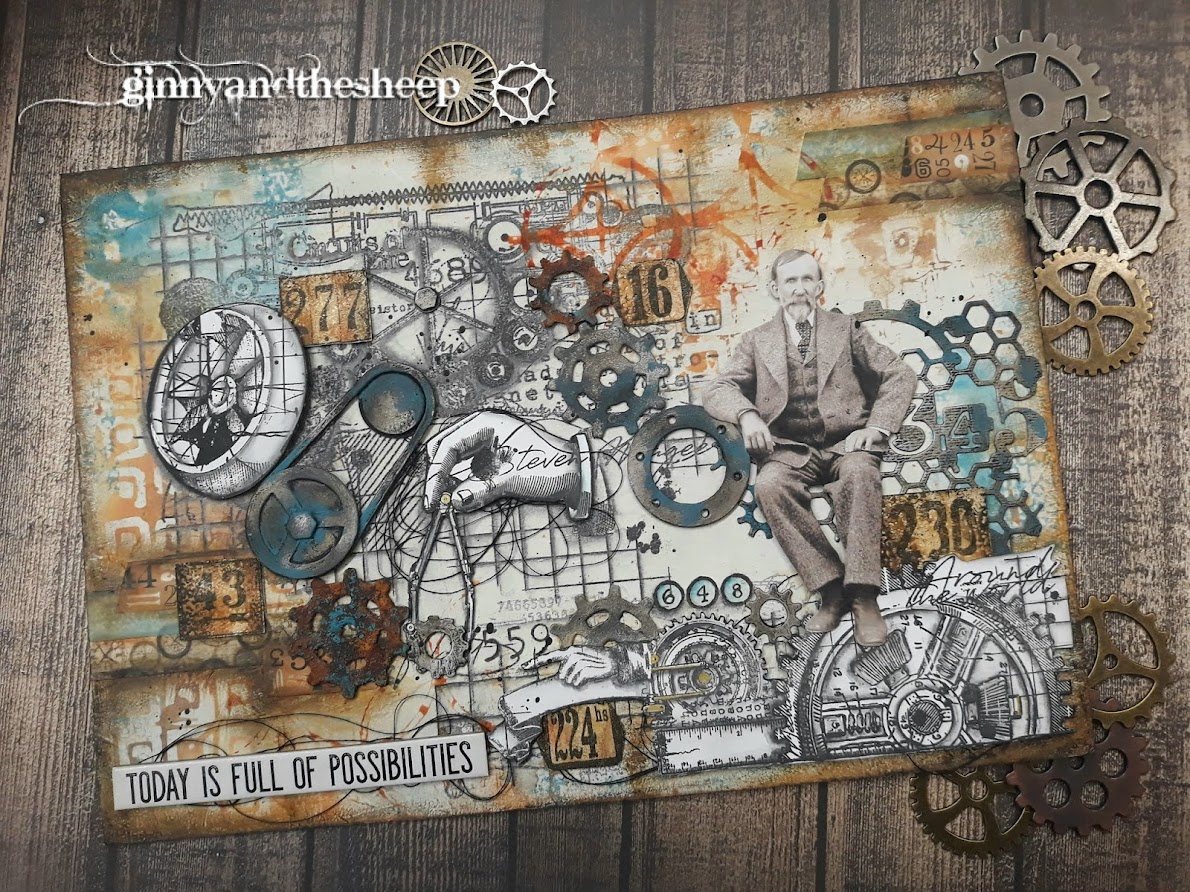
Ho incollato il Tissue wrap ad un cartoncino di recupero, in modo volutamente imperfetto, creando delle grinze per avere più texture. Dato una mano di gesso bianco, poi ho steso il colore acrilico di fondo e con vari stencil ho aggiunto altri colori. Ho timbrato con inchiostro nero, poi coperto con altre stencilate, ed infine aggiunto della modeling paste. Una volta asciutta ho colorato le parti in rilievo usando i Distress Crayons. Ho steso del gesso nero sui bordi ed aggiunto dettagli con penne Uniposca bianche.
Ho colorato un foglio per acquerello con i Distress Oxides e poi l'ho fustellato per creare i fiori. Su un paio ho spruzzato uno  spray fatto con il Magicals Drop Dead Gorgeous Green della Lindy's.
Sui fiori dietro alle Paper Dolls ho aggiunto dei Distress inks, ho poi incollato tutti gli abbellimenti, aggiungendo anche dei filati colorati per maggiore movimento e degli strass.

I glued Tissue wrap on a recycled cardstock, in a very imperfect way, creating wrinkles for more texture, then covered with a thin wash of white gesso.. Added the background colour, then others using various stencils. Stamped with a black archival ink, then added more stencil touches, and last modeling paste. Coloured the raised areas with Distress Crayons, then a touch of black gesso on the edges and added details and doodling with white Posca pens.
Coloured a watercolour cardstock with Distress Oxides, then die cut some flowers. On some added green with a spray made with Lindy's Magicals Drop Dead Gorgeous Green and on  the two behind the girls added Distress Inks. Finally glued all the embellishments, adding also embroidery thread and blings.


Presento questa tag alle seguenti sfide.../ I submit this tag to the following challenges...


Lista materiali / Supplies list:

- Cartoncino recupero  / Recycled Cardboard
- Tim Holtz/Sizzix Movers & Shapers Mini Tattered Floral Set
- Tim Holtz/Sizzix Base Tray
- Sizzix Big Shot
- Tim Holtz Idea-ology 'Postale' Tissue Wrap
- Stampers Anonymous/Tim Holtz Collection Layering Stencils: Honeycomb, Industrial, Typo, Rays
- Stampers Anonymous/Tim Holtz Collection 'Dapper' Stamp set
- Tim Holtz Idea-ology Paper Dolls
- Tim Holtz Idea-ology Adage Tickets
- Tim Holtz Idea-ology Quote Chips
- Ranger/Dylusions paints: Black Marble, White Linen, Squeezed Orange, Calipso Teal
- DecoArt Americana paints: Olive Green, Royal Fuchsia
- White Gesso
- Finnabair/Prima Heavy Black Gesso
- Modeling Paste
- Ranger Distress Oxides Inks: Fossilized Amber, Wild Honey, Spiced Marmalade, Abandoned Coral, Seedless Preserve
- Ranger Distress Inks: Spiced Marmalade, Seedless Preserve
- Ranger Distress Crayons: Twisted  Citron, Seedless Preserve, Spiced Marmalade
- Ranger Archival Ink Black
- Lindy's Stamp Gang Magicals Drop Dead Gorgeous Green
- Uniposca white pens
- Aleene's Tacky Glue
- Filati da ricamo / Embroidery Threads
- Strass / Rhinestones


Ci vediamo alla prossima...

See you next time...

Kisses&Hugs!
Simo.


domenica 22 aprile 2018

Scrap & Craft DT: Art Journal...Be Authentic


Ciao a tutti! Eccomi qui con un nuovo post per il DT di Scrap & Craft...
Ho fatto un'altro spread nel mio Dylusions Creative Journal, utilizzando le bellissime carte di Craft O' Clock e di Studio75...posso  dire che adoro questi soggetti? Carte con le fantasie del legno, questi fiori e colori tenui...mi fanno venire in mente immagini di un giardino di altri tempi...

Hello everyone! Here I am with a new project made for Scrap & Craft DT...
I made another spread in my Dylusions Creative Journal, using beautiful papers from Craft O' Clock and Studio75 collections...may I say that I love them? Wood patterned papers, those flowers and colours...they recall to mind gardens of the past...

Ho incollato vicino al centro pagina, due strisce ricavate dal foglio n.4 del set 12x12 'The Peony Avenue' di Studio75, poi ho tagliato a metà il foglio n.4 della collezione 'Morning Dreams II' di Craft O' Clock e le ho attaccate alle pagine dell'Art Journal con una spillatrice.
Coperto prima con gesso trasparente e poi un wash di gesso bianco molto diluito, senza toccare i fiori. Ho aggiunto della texture paste usando un paio di stencils, poi ho iniziato a spruzzare i vari inchiostri, diluendoli con acqua a piacere, sempre asciugando tra uno step e l'altro.
Una volta soddisfatta ho aggiunto delle timbrate di sfondo con il Distress Oxide Hickory Smoke e poi fatte cadere varie gocce di inks.

I have cut two strips from the sheet #4 of 'The Peony Avenue' collection by Studio75, and glued every strip close to the centre of the  pages, then chose a sheet of paper from the beautiful 'Morning Dreams II' collection, by Craft O' Clock, the #4, cut in half , then attached each one  using a stapler.
Used first clear gesso on the spread, then a light wash of white gesso, but not on the flowers.
Added some texture paste using two different stencils, then started adding colours using spray inks, spritzing water to dilute them a bit, always drying between each step.
When I was satisfied I added some stamping here and there with Distress Oxide ink, then flicked some drops of inks all over the spread.


Dal foglio n.5 di 'Morning Dreams II' ho ritagliato varie composizioni di fiori, ed ho iniziato ad assemblare tra loro i vari elementi decorativi...Ho aggiunto la foto di un bellissimo gatto, presa dal web, ma che è identico  al gattone che avevo una volta...me ne sono innamorata...
Ho aggiunto parecchie fustellate fatte su cartoncino bianco, per mantenere un tono molto 'soft', poi ho aggiunto un centrino di carta, della garza e del fino. Per finire ho incollato un 'Clipping' sticker e 2 Quote Chips della linea Idea-ology di Tim Holtz.

From sheet #5 of 'Morning Dreams II' collection I have fussy cut few flowers, then started to assemble all the embellishments...Added a picture of a beautiful cat, taken from the web, but it is identical to my long gone cat...and I felt in love with it...
Also added several die cuts from white cardstock, because I wanted to keep everything clear and soft, some gauze, a paper doily, some thread, and finished with Tim Holtz  Idea-ology 'Clipping' sticker and 2 Quote Chips..


Ho usato il seguente materiale che potete trovare nello Shop di SCRAP & CRAFT:

I have used the following material that you can find in the SCRAP & CRAFT Store:


Presento questo progetto per la seguente sfida/I submit this project to the following challenge:

MORE THAN WORDS APRIL 2018 CHALLENGE - NATURE & ANIMAL
The word NATURE  inspired me to create a sort of a garden where this beautiful cat could roam, pretending to be a fierceful wild animal in a jungle...
You can see it in its eyes...


Grazie per essere passati...spero vi sia piaciuto il progetto! Ci vediamo alla prossima!

Thank you for stopping by, hope you got inspired and...see you next time!

Kisses&Hugs!
Simo.

EDIT...Felicissima di essere stata inclusa nelle Honourable Mentions per la Sfida di Aprile di More Than Words...

I'm so happy to have been included in the Honourable Mentions for the April Challenge over at More Than Words


giovedì 19 aprile 2018

Do you DOODLE?


Ciao e bentornati! Post veloce con una pagina di Art Journal...il mio 'mega' Journal Dylusion ancora mi intimorisce un po'...sarà che ero abituata a pagine più piccole, avere tanto spazio a disposizione mi crea un attimo di panico ogni volta...per questo voglio cercare di 'attaccarlo' il più possibile...alla fine vincerò questa paura! Lol!

Hello and welcome back! Today just a quick post for a page in my Art Journal..my 'huge' Dylusion Journal which I still find a bit intimidating...maybe because I was used to much smaller pages, having so much space to create in it makes me panic a bit every time...that's why I want to use it and abuse it as much as possible...in the end I will overcome this fear! Lol!

Ho quindi preso la palla al balzo, sfruttando la sfida del Lunedì sul Blog di SIMON SAYS STAMP, che come tema ha 'LET'S DOODLE'...ispirata dai bellissimi progetti del loro Design Team, ero partita con un'idea completamente diversa...e sono finita con questa pagina...che novità...he he he! Diciamo che il mio percorso ha fatto una deviazione introspettiva...e mi sono divertita da matti a scrivere e 'doodlelare' tutto quello che mi frullava per la testa, partendo da questo bellissimo stencil di The Crafter's Workshop, 'Mini Silhouette Script'.
Dopo una mano di gesso, ho spruzzato gli inchiostri Ink Extreme di TommyArt, Tiffany e Smeraldo, poi fatto cadere delle gocce di Tiffany e Senape. Poi ho aggiunto lo stencil usando i Distress Oxides Cracked Pistachio, Wild Honey, Peacock Feathers e Broken China. Ho ripassato i contorni con un maker nero punta fine, ho aggiunto delle scritte, poi ho utilizzato lo stencil 'Piume 2' di TommyArt e tracciato delle piume con la matita, che ho ripassato con il marker. Ho aggiunto il Wink of Stella Clear sulle piume e dei tocchi con la penna gel oro e con Uniposca bianco. Ho disegnato una cornice alla pagina ed aggiunto delle gocce di Crystal Drops della Nuvo, sia oro che bianche.

So I grabbed the chance to play in it, with the new challenge over at SIMON SAYS STAMP MONDAY CHALLENGE Blog, as the new theme is 'LET'S DOODLE'...I was inspired by the amazing projects of their Design Team and started with a very different idea...and ended up with this page..shocking news...he he he! Let's say that my journey took an introspective detour...and I had so much fun to write and doodle every thing that came through my mind, starting from this awesome stencil by The Crafter's Workshop, 'Mini Silhouette Script'.
After a layer of white gesso, I sprayed with Ink Extreme by TommyArt, Tiffany and Emerald, then let fall few drops of Tiffany and Mustard. Added the stencil with Distress Oxides Cracked Pistachio, Wild Honey, Peacock Feathers and Broken China. 
I doodled around the silhouette with a fine tip marker, adding words, then using a TommyArt stencil 
' Feathers 2' I traced few feathers with a pencil and then with the marker. Filled the spaces with Clear Wink of Stella and added few touches with a gold gel pen and a white posca pen.
Drew a frame all around the page, adding some sentiments, and finished it off with Nuvo Crystal Drops, both gold and white.


Mi sono divertita tanto che ho fatto anche un segnalibro...
I had so much fun that made also a bookmark...


Questo è quanto...e voi? Vi divertite con i Doodles?

That's it...and you? Do you Doodle?

Ci vediamo alla prossima....See you next time...
Kisses&Hugs!

Simo.


venerdì 13 aprile 2018

Scrap & Craft DT ...Spread your wings and Fly!


Ciao a tutti! Sono molto felice di mostrarvi il primo progetto fatto per il Design Team di Scrap & Craft...ispirata dagli alberi in fiore e dalla bellissima serie di carte 'Cherry Blossom' di Studio75 ho creato questa Tag, lasciando perdere per una volta i toni marroni e grunge a me cari, ed optando per vari toni del rosa...mi rendo conto che ultimamente sono molto presa dal tema del volo...Lol!
Poi ho una bella novità che voglio condividere con voi...ma vi do appuntamento alla fine del post!

Hello everyone! I am so happy to share with you my very first project made for the Scrap & Craft Design Team...Inspired by the blossoming of the trees and the fabulous Studio75 paper 'Cherry Blossom' I have created this mixed media Tag...for once I have dismissed those grunge colours I love so much for different shades of pink...I just realized that lately I am quite obsessed by wings and flights...Lol!
Then I have great news I want to share with you...but you'll have to get to the end of this post!

Iniziamo! Ho incollato una striscia ricavata dal foglio 'Cherry Blossom 01' and un pezzo di cartone, ho tagliato gli angoli per dare la forma di una Tag ed ho rovinato i bordi con le forbici.
Ho steso un velo di gesso bianco, aggiunto delle timbrate con inchiostro archival e con lo stencil 'Marocco Clover' della Studio75 ho aggiunto un po' di texture con la modeling paste. Una volta asciutta ho iniziato a spruzzare vari inchiostri nei toni del rosa e del fuchsia, diluendo con acqua ove necessario. Ho schizzato con delle gocce di ink fuchsia e nero ed ho scurito i bordi con i Distress inks Gathered twigs e Black Soot.

Let's start! I have glued a strip of Studio75 'Cherry Blossom 01' paper to a piece of cardboard, cut to give it a Tag shape and distressed the edges.
Covered with a thin layer of white gesso, then added some stamping with archival ink. Added texture paste using Studio75 Stencil 'Marocco Clover' and once dry I spritzed few inks in different shades of pink and fuchsia, adding water when needed. I then flicked some drops of colours, both fuchsia and black, and darkened the edges with Gathered twigs and Black Soot Distress ink.

Ho poi incollato i vari abbellimenti...ho usato delle fustellate dipinte con gesso nero e poi con le Alchemy Wax di Prima/Finnabair: Antique Brilliance Amethyst Magic e Lucky Emerald  e Metallique Vintage Gold, dei fiori riciclati dalla confezione della Colomba pasquale, un pezzo della  carta patterned usata come base, ma questa volta mostrando la fantasia della 'facciata B', del vellum, del pizzo, una Paper Doll di Tim Holtz, insieme ad alcuni 'Clippings stickers' ed una 'Quote chips'.
Per finire ho aggiunto un pezzo di nastro 'Organza Rose trim' in tinta ecru, per un perfetto tocco Vintage e delle gocce di 'Nuvo' crystal drops color oro. Sotto qualche dettaglio...

Then I gathered all the embellishments: some lace,  a strip of the 'Cherry Blossom 01' paper, showing the pattern of the reverse side, a piece of vellum, die-cuts  painted with black gesso and then with Prima/Finnabair Alchemy waxes (Antique Brilliance Amethyst Magic and Lucky Emerald  and Metallique Vintage Gold),  Tim Holtz Paper Doll, 'Clippings stickers', a Quote chip and bits and pieces from my stash, then attached a piece of ecru Organza Rose Trim, which added the perfect vintage touch and few gold 'Nuvo crystal drops' here and there... here you can see more details...


Ho usato il seguente materiale che potete trovare nello Shop di Scrap & Craft :
I have used the following materials that you can find in the Scrap & Craft shop:

Ed ora la novità.... è nato il gruppo MIXED MEDI@ ITALIA , creato con queste mie talentuose e care amiche... SABRINA PERNA  , GIULIANA BALLATORE e TERELISA AGOSTI .
Avendo una passione insana e comune per il Mixed Media abbiamo deciso di ricavarci un nostro posticino, dove condividere ciò che sappiamo, imparare le une dalle altre...di crescere divertendoci.
Speriamo possa diventare uno spazio sicuro per altre creative che, come noi adorano tutto ciò che il Mixed Media significa.. cioè la libertà di creare e sperimentare, senza limiti, senza paure...
Quindi, se anche voi vi sentite descritti in queste parole, veniteci a trovare...ci sarà da divertirsi!

And now....the great news...we have created a Facebook Group MIXED MEDI@ ITALIA, together with my talented and dear friends...SABRINA PERNA, GIULIANA BALLATORE and TERELISA AGOSTI. 
We share a mad passion for anything Mixed Media related, so we decided to 'carve out' a little place where to share the things we learnt along the way, to learn more from each other...to grow while having fun. We hope it will become a safe harbour for other creative friends who, like us, love what Mixed Media represents...that is the freedom to create and experiment without boundaries, without fear...
So, if you feel this place has your name written on it...come join us...it will be fun!


Mai come ora mi sembra giusto seguire questo consiglio...Learning to Fly...imparare a Volare!
Grazie per essere passati...Alla prossima!

This is the perfect time to follow this advice...Learning to Fly!
Thank you for stopping by...See you next time!

Kisses&Hugs!
Simo.


martedì 10 aprile 2018

HAPPY LITTLE STAMPERS APRIL 2018 ATC CHALLENGE: BUTTERFLY...


Ciao a tutti!...Eccoci al nostro consueto 'appuntamento' con HAPPY LITTLE STAMPERS ATC CHALLENGE per il mese di APRILE: il tema è 'BUTTERFLY'...quindi cercate tra i vostri timbri, carte ed abbellimenti tutte le farfalle che avete e divertitevi con noi!

Hello everyone and welcome back...Here we are for our monthly  HAPPY LITTLE STAMPERS ATC CHALLENGE ... for APRIL our theme is  'BUTTEFLY'...so let us see all those fluttering beauties you keep in your stash, and join our challenge!


Il vincitore di questa sfida riceverà un coupon di $20 da spendere nello SHOP! Potete trovare tutti i dettagli QUI.

Our winner for this challenge will receive a $20 coupon to spend at the SHOP! Check out all the details HERE.

Per questa serie di ATC ho preso un foglio pesante per acquerello (300 gr) della dimensione di 24x32 cm (ho usato un blocco della Canson 'Montval') .
Ho steso una mano di gesso trasparente e poi sul retro ho delineato gli spazi delle varie ATC - che vi ricordo devono essere 64x89 mm cioè 2,5x3,5 inches - ricavandone 10. Ho fatto la stessa cosa sul davanti, in modo MOLTO leggero con una matita acquarellabile. Poi in base alle linee di taglio ho iniziato a timbrare con un inchiostro Archival (cioè permanente e resistente all'acqua), ho aggiunto della texture con della modeling paste ed uno stencil e lasciato asciugare bene.
Ho ritagliato le varie ATC ed iniziato ad aggiungere il colore.
Ho colorato con pigmenti in polvere ed inchiostro spray color giallo, ed usato un inchiostro nero steso a pennello per le parti a contrasto, spruzzando con acqua per diluire dove necessario, poi ho ripassato i bordi con il Distress Black Soot.

For these ATCs I started with a sheet of  140 lb watercolour paper measuring 9,4 x 12,6 inches, spread clear gesso then marked both sides with the 'guide/cut lines' fot the ATCs - that must be 2,5x3,5 inches each - obtaining 10 of them. Keeping in mind the lines I added stamped images, with archival ink, then added texture with a stencil and modeling paste, let everything dry well then cut them to size.
Painted with yellow watercolour powders and spray inks, and used a brush to add black ink as contrast, spraying with water as needed...finished with Distress Black Soot on the edges.


Per il punto focale ho timbrato varie volte una farfalla su cartoncino bianco, sempre con inchiostro Archival, e poi mi sono divertita a colorarla con schizzi di colore nero e giallo, andando a riempire maggiormente alcune zone, per aumentare il contrasto. Poi le ho ritagliate ed incollate alle ATC.

For my focal point I stamped various times a buttefly on white cardstock, then added colour simply by flicking drops of yellow and black, and adding more colour only in few spots, for more contrast.
Then fussy cut them and glued to the ATCs.


Ecco i dettagli delle ATC finite...
Here you can see the details of the finished ATCs...


Ecco fatto...spero di avervi dato qualche idea...date un'occhiata alle ATC delle mie compagne di DT, per ulteriore ispirazione! Ora tocca a voi...mi raccomando...create, divertitevi e postate i vostri lavori QUI ...in palio un buono per i vostri acquisti nello Shop!

That's it...Hope you got some inspiration...give also a look to my Teamies ATCs for more ideas! Now it's up to you...create, have fun and link your work HERE... you could win a coupon for your shopping in the HLS Shop!

Grazie per essere stati in mia compagnia, ci vediamo alla prossima!
Thank you for stopping by, see you next time!

Kisses&Hugs!
Simo.


lunedì 9 aprile 2018

Use your Wings...


Ciao a tutti! Eccomi qui dopo un po' di latitanza, per mostrarvi questa card un po' particolare...
Preparata recentemente per una DT call, ma mai pubblicata! Stavo scrivendo un tutorial quando è uscita la nuova Sfida del LUNEDI di SIMON SAYS STAMP...MYTHOLOGY/INSPIRED BY A STORY, ed ho pensato che fosse assolutamente perfetta per rappresentare uno dei miti più famosi di tutta la Mitologia Greca: Il volo di ICARO.
Certo il mio Icaro non è un ragazzino...me lo immagino più adulto, piuttosto che un giovane troppo preso dal suo volo per ascoltare le raccomandazioni  e destinato ad una rovinosa caduta.
Con la saggezza dell'età e dell'esperienza il nostro nuovo Icaro può vivere la sua vita in modo coraggioso, ed usare le sue ali per volare alto.

Hello everyone! Here I am, after some MIA time, to show you this slightly different card...
I made it recently for a DT call, but never published! I was writing a tutorial about it when the new MONDAY Challenge over at SIMON SAYS STAMP Blog came out...MYTHOLOGY/INSPIRED BY A STORY, and I thought it could be perfect to represent one of most famous Greek Myths: the flight of ICARUS.
Well my Icarus is not exactly a young boy...I like to think about him more as a grown-up then a boy too elated by his flight to listen to the warnings and destined to his fall.
With the wisdom of the age and experience our modern Icarus can live his life bravely and use his wings to fly high.


Ed ora ecco gli steps... su un cartoncino pesante per acquerello ho aggiunto della pasta modellabile con uno stencil, poi ho fatto cadere delle gocce di InkExtreme 'Smeraldo' di TommyArt e spruzzato con acqua per far correre il colore. Asciugato poi fatto cadere i Rainbow Colors Duo 'Yellow Amber' e 'Turquoise' della 13Arts, che sono pigmenti in polvere, attivati con acqua ed asciugato di nuovo...

Now for the step-by-step...on a heavy watercolour cardstock I added some modeling paste with a stencil, then flicked few drops of 'Emerald' InkExtreme by TommiArt and spritzed with water to make the colour run. Dried very well the added 13Arts powdered watercolour dyes Rainbow Colors 'Yellow Amber' and 'Turquoise', activated with water and then dried again...


 Nello step successivo ho aggiunto i Distress Oxides, schiacciando il pad direttamente sul craft mat, spruzzando con acqua e raccogliendo il colore con il cartoncino.
Prima ho usato il Peacock Feathers, poi il Wild Honey...ricordate di asciugare tra un colore e l'altro.

In the next step I have used Distress Oxide Inks, 'smooshing' the pad directly on the craft mat, spritzing with water and dabbing the cardstock into the colour.
First I have used Peacock Feathers, then Wild Honey...remember to dry before adding the next colour.


Una volta soddisfatta della tonalità, ho aggiunto delle timbrate con inchiostro archival nero...

Once pleased with the outcome, I added few stamps here and there using a black archival ink...


Ho ritagliato a misura, timbrato un paio di ali che ho colorato con una Posca pen bianca e poi aggiunto delle cuciture decorative. Ho timbrato delle piume su un foglio di pellicola di plastica 'Shrinkie' e colorate con i Distress Markers Peacock Feathers, Mermaid Lagoon e Hickory Smoke, poi le ho ritagliate e 'rimpicciolite' con l'embosser.
Ho poi utilizzato le fustelle 'Movers & Shapers - Mini Bird & Cage set' di Sizzix/Tim Holtz Alterations, ho ritagliato delle sbarre dalla gabbietta ed 'arrugginita' con le Rust Paste di Prima/Finnabair, sull'uccellino ho passato le cere di Prima/Finnabair Opal Magic 'Turquoise Satin' e Metallique 'Vintage Gold'.
Ho assemblato il tutto partendo da una Paper Doll di Tim Holtz, ho aggiunto il resto e per finire 2  Small Talk Stickers sempre della linea Idea-ology di Tim Holtz.
Ho incollato il tutto su di un cartoncino nero piegato a formare una card.

Cut to measure, stamped a pair of wings and painted them with a white Posca pen, then added decorative stiching. I have stamped some feathers on a sheet of white 'Shrinkie' plastic, added colour with Distress Markers Peacock Feathers, Mermaid Lagoon and Hickory Smoke, then fussy cut and shrinked with a heat tool.
Used Sizzix/Tim Holtz Alterations 'Movers & Shapers - Mini Bird and Cage set' dies, cut out the bars from the cage and added a bit of rust with Prima/Finnabair Rust Paste, while on the birdie I added touches of Prima/Finnabair Art Alchemy waxes - Opal Magic 'Turquoise Satin' and Metallique 'Vitage Gold'.
Assembled everything...added an Idea-ology Paper Doll and a couple of Small Talk Stickers, always by Tim Holtz.
Attached to a piece of black cardstock scored in the middle to make a card.


Ho anche aggiunto un cartoncino bianco all'interno, timbrando un sentiment dal set ETS05 di PaperArtsy, con il Distress Oxide Peacock Feather.

Also added a piece of white cardstock to the inside, stamping a sentiment from PaperArtsy set ETS05, using Distress Oxide Ink Peacock Feather.


E con questo siamo arrivati alla fine...Vi ringrazio per essere passati di qua! Ci vediamo alla prossima!

That's it...Thank you for stopping by...See you next time!

Kisses&Hugs!
Simo.

EDIT:
Sono felicissima di essere stata scelta per il DESIGNER SPOTLIGHT con questa card...Grazie!!!
I am so happy to be featured in the DESIGNER SPOTLIGHT with this card...Thanks so much!!!