martedì 23 gennaio 2018

Tag ART...


Ciao a tutti! Si lo so...tre post in tre giorni...da non credere! Lol! Ma sono stati giorni intensi questi appena trascorsi...molti di voi avranno sentito parlare della manifestazione 'Creativation' (ex CHA) che si volge a Phoenix - Arizona...praticamente dove le ditte che creano tutti i prodotti che noi amiamo tanto usare ed i designers che tutti adoriamo, presentano le ultime novità del settore...insomma il paradiso dei crafters in terra...Ma grazie alla tecnologia ed alle dirette 'live' rimbalzate sui vari social, anche le persone come me, che  possono solamente sognare di partecipare ad un'evento  simile, hanno potuto essere in qualche modo coinvolte in tutto ciò! Un tripudio di colori, inchiostri, carte, fustelle, timbri, attrezzi...insomma ecco che la lista delle 'necessità' si allunga in modo vertiginoso...
Tra tutte queste dirette, quelle da me più seguite avevano un solo protagonista...TIM HOLTZ...e niente...io adoro quest'uomo! Geniale, ogni volta che fa uscire qualcosa riesce a rendertela necessaria, mostrando mille modi per usare i prodotti...e tra le varie tecniche che ha mostrato una mi ha colpito in modo particolare, non solo perchè l'ho trovata brillante, ma anche perchè, incredibilmente, avevo già tutto l'occorrente in casa...FINALMENTE!!!!

Hello everyone! Yes, I know...three posts in three days...hard to believe! Lol! But these last few days have been so amazing...many of you surely have heard about 'Creativation' (former CHA), that took place in Phoenix - Arizona...where all the companies behind the products we so love to use and the designers we all love, gather to introduce to the market the latest news...the crafter's heaven on heath!
Thanks to technologies and 'live' broadcasts jumping through the social media, people like me, who will never have the chance to attend such an event, just felt the exhilaration, the excitement of 'being there'! A whole lot of new colours, inks, dies, stamps, tools...a neverending list of new 'needs'...each day getting a bit longer...
Among all these 'live', the ones I waited for and cherished the most had one character only...the one and only TIM HOLTZ! I just love this man...he's a genius! He knows how to make every new release a necessity, just showing every different way to use his products...during his demos, one in particular got my attention...not only because it was brilliant, but also because, for the very first time, I had all the products needed in my stash....FINALLY!!!

Quindi senza ulteriori indugi ecco la mia tag...
Therefore, without further ado, here's my tag...


In pratica si crea uno sfondo con i Distress Oxides, utlizzando come supporto i cartoncini 'Alcohol Inks Cardstock' della Ranger. Questo tipo di cartoncino ha una superficie Lucida, ma per come è stato concepito in pratica assorbe il colore. Una volta creato lo sfondo con gli Oxides, si verrà a creare una superficie opaca, ossidata appunto, ma basta applicare un po' di Distress Micro Glaze per far risaltare tutti gli strati dello sfondo e contemporaneamente ridare brillantezza al tutto (e renderlo waterproof).
Ho usato i seguenti Distress Oxides:
Antique Linen + Frayed Burlap
Vintage Photo + Spiced Marmalade
Peacock Feathers
Walnut Stain
Black Soot
Fired Brick
Spiced Marmalade
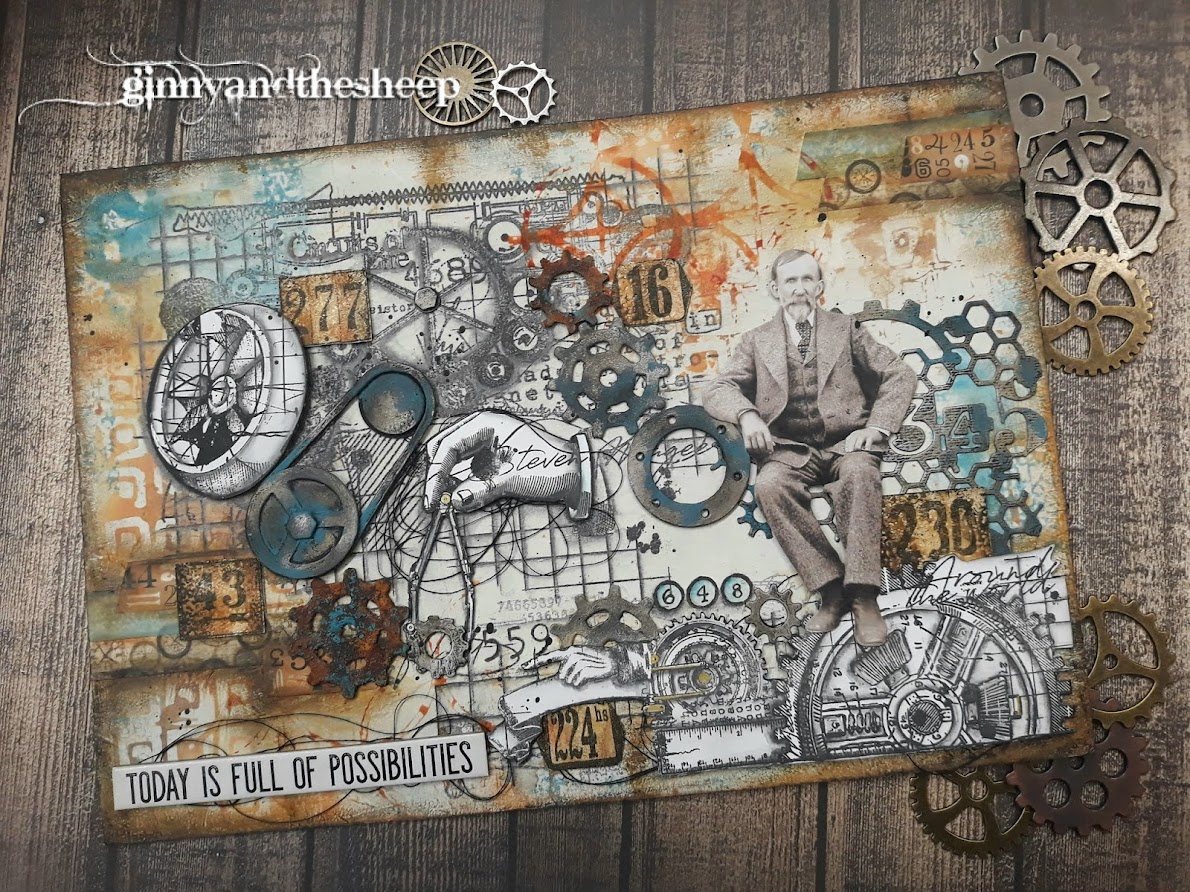
Quindi dopo aver 'strisciato' il cartoncino nel colore steso sul Craft Mat (spruzzato con acqua), varie volte, ed asciugato tra una passata e l'altra, ho stampato varie immagini con inchiostro archival marrone ed usato inchiostro Archival nero per le immagini che volevo in evidenza ('Dapper', 'Lady Rose' sets di Stampers Anonymous/Tim Holtz ed un timbro con farfalle dal set Tim Holtz Alcohol Inks Kit di Ranger).
Asciugato e poi passato la Distress Micro Glaze con un blending tool, aspettato che si asciugasse e ripassata con un panno per renderla lucida. Ho ritagliato con la fustella più grossa del set 'Tag Collection' di Sizzix/Tim Holtz Alterations, ho incollato la tag ottenuta su cartoncino nero e poi su un pezzo di sughero che ho ritagliato per dargli la forma di una tag. Ho aggiunto degli ingranaggi ritagliati con la fustella 'Gadget Gears 2' Sizzix/Tim Holtz Alterations, su cui ho aggiunto un po' di Alchemy Wax 'Metallique' Vintage Gold di Prima/Finnabair, e per finire una Quote chip, una Memo pin ed un Adage Ticket della linea Idea-ology di Tim Holtz.


Basically you create a background using Distress Oxides on an Alcohol Ink Cardstock by Ranger...though the surface is Glossy, the ink just soaks in. Once the backgound is completed and you have a now oxidized cardstock, all it takes is Distress Micro Glaze to make all the layers to stand out and the surface to be shiny again, and waterproof.
I have used the following Distress Oxides:
Antique Linen + Frayed Burlap
Vintage Photo + Spiced Marmalade
Peacock Feathers
Walnut Stain
Black Soot
Fired Brick
Spiced Marmalade
So I just dipped my Glossy cardstock in the Oxides 'smooshed' and spritzed onto the Craft mat, drying between layers, then stamped my images for the background with brown archival ink and the ones I wanted to be on top with a black  archival ink (I have used 'Dapper', 'Lady Rose' sets by Stampers Anonymous/Tim Holtz and a butterfly stamp from Tim Holtz Alcohol Inks Kit by Ranger).
Blended in the Distress Micro Glaze with a blending tool and polished with a towel. From the cardstock I have die-cut a Tag using the 'Tag Collection' set of framelits by Sizzix/Tim Holtz Alterations, pasted onto black cardstock then onto a piece of cork. Added a couple of die-cut gears from the 'Gadget Gears 2' die by Sizzix/Tim Holtz Alterations, aged with 'Vintage Gold' Metallique Alchemy wax by Prima/Finnabair. To finish it off added a Quote chip, a Memo pin and an Adage Ticket, all from Idea-Ology by Tim Holtz

Do you see the shine? I love this technique!!!


Con questo progetto partecipo alle seguenti sfide:
I submit this project to the following challenges:

- SIMON SAYS STAMP MONDAY CHALLENGE - TAG IT

- SANDEE & AMELIE'S STEAMPUNK CHALLENGE - 
  ANYTHING GOES - STEAMPUNK/INDUSTRIAL

E con questo è tutto...grazie per essere passati, alla prossima!

That's it for today...thank you for popping by...see you next time!

Kisses&Hugs!
Simo.

lunedì 22 gennaio 2018

Make a Wish...


Ciao a tutti e bentornati! Solo un post veloce per condividere con voi il progetto preparato per partecipare alla sfida di Gennaio sul Blog di MORE THAN WORDS ...
La parola da usare era BIRTHDAY ed il prompt era di inserire almeno due Tags.
Mi sono molto divertita a creare vari layers per questo LO, ed usare una foto del compleanno della mia nipotina di qualche anno fa...come passa il tempo...oggi la nostra Principessa ha ben 5 anni, come mi ha fatto notare...ed è grande! Ma per il mio cuore di zia rimangono, sia lei che suo fratello, i fagottini che erano la prima volta che li ho presi in braccio!

Hello everyone and welcome back! Just a quick post to share with you the project I have made to enter January Challenge over at MORE THAN WORDS Blog...
The word to be used was BIRTHDAY and the prompt was to use at least 2 Tags.
I really had fun building layers for this Layout, and used a pic of my Niece's birthday of some time ago...gosh time really flies...today our little Princess is 5 years old and, as she pointed out, she is big now! But to my 'Auntie's heart' both her and her brother will always be the sweet little bundles of joy they used to be the first moment I took them in my arms!


Ho usato alcuni spray della Lindy's Stamp Gang, timbri della Carabelle Studio e fustellate da un paio di alfabeti di Tim Holtz.

I have used few Lindy's Stamp Gang sprays, Carabelle Studio stamps and die-cuts of a couple of Tim Holtz Alterations alphabets.

Con questo Layout 12x12 partecipo alla sfida di Gennaio di MORE THAN WORDS
I am entering MORE THAN WORDS JANUARY CHALLENGE with this 12x12 Layout

Cliccate sulla foto per andare alla sfida / Just click on the pic to go to the Challenge

Grazie per essere passati di qua...ci vediamo alla prossima!

Thank you for stopping by...see you next time!

Kisses&Hugs!
Simo.


EDIT: Honourable Mention over at More Than Words Blog...so happy!


domenica 21 gennaio 2018

Debutto nel DT di MarteLAB !


Ciao a tutti e bentornati! Oggi voglio condividere con voi il mio primo tutorial fatto per il DT di MarteLAB ... CLICCATE QUI  per andare al post con tutte le info...

Grazie per essere passati...ci vediamo alla prossima!

Kisses&Hugs!

Simo.


giovedì 18 gennaio 2018

BE BRAVE...USE YOUR WINGS...


Ciao a tutti e benvenuti nella mia ossessione per i Distress Oxides! Ebbene si...lo confesso...ormai da tempo sono 'vittima' di questo incantesimo...se poi a questo aggiungiamo anche la 'Sneak Peek' di Tim Holtz sulla release di nuovi colori, posso tranquillamente dire che non ne verrò mai fuori! Lol!!!

Hello and welcome to my Distress Oxide's Obsession! Yes...I confess...it's quite a long time that I am under this spell...and if we add Tim Holtz 'Sneak Peek' about the release of new sets of colors, I can definitely state that I will never get over this! Lol!!!

Tutto questo parlare di Oxides perchè in pratica ho usato solo questi per fare la Tag qui sopra...ad eccezione di Gesso Clear e Gesso Nero.
Ho usato un cartoncino azzurro che ho ricoperto con Gesso Trasparente, poi ho iniziato a stendere i Distress Oxides con un Blending Tool, asciugando dopo ogni colore e poi spruzzando con acqua. Con il Gesso Nero ho colorato i corvi e le piume del set di thinlits 'Feather & Ravens' - Sizzix/Tim Holtz Alterations, mentre ho ritagliato gli uccelli sullo sfondo con le fustelle del set 'Scarecrow' - Sizzix/Tim Holtz Alterations. Ho steso degli Oxides sul Craft Mat, spruzzati con acqua e ci ho passato dentro le piume. Ho mattato la Tag con del cartoncino nero ed ho inserito un eyelet con la Crop-a-dile, poi ho assemblato il tutto. Come tocco finale ho aggiunto dei Quote Chips della Idea-ology di Tim Holtz.

I keep chatting about Oxides because I used only those, except for Clear and Black Gesso, to make this Tag.
I have used a sky-blue cardstock, painted with Clear Gesso, then blended in the Oxides with a Blending Tool, drying after every layer of colour and spritzing with water. With Black Gesso I painted the crows and the feathers, die-cut with 'Feather & Ravens'  thinlits by Sizzix/Tim Holtz Alterations, while I die-cut the little birds in the background using thinlits from the set 'Scarecrow' - Sizzix/Tim Holtz Alterations. 'Smushed' the Oxides on the Craft Mat, spritzed with water and picked up the color with the feathers. I attached black cardstock on the back of the Tag, and set an eyelet with the Crop-a-dile, then assembled the rest. As a final touch I added a couple of Tim Holtz Idea-ology Quote Chips.


Con questa Tag partecipo alla seguente sfida/ I submit this Tag to the following challenge:


Grazie per essere passati di qua...ci vediamo alla prossima!

Thank you for stopping by...see you next time!

Kisses&Hugs!
Simo.


mercoledì 10 gennaio 2018

First post for HAPPY LITTLE STAMPERS: ATC January Challenge....


Ciao a tutti e bentornati su queste pagine...Oggi inizia la mia avventura con HAPPY LITTLE STAMPERS, infatti sono entrata a far parte del ATC CHALLENGE DESIGN TEAM...per i prossimi 6 mesi  potrete trovare un mio tutorial di ispirazione per la Challenge...Iniziamo con 'ALBERI'!

Hello everyone and welcome back on these pages...Today starts my adventure with HAPPY LITTLE STAMPERS, as a member of their ATC CHALLENGE DESIGN TEAM...for the next 6 months you will find an inspirational tutorial for the ongoing Challenge...Let's start with 'TREES'!


Il vincitore di questa sfida riceverà un coupon di $20 da spendere nello SHOP! Potete trovare tutti i dettagli QUI.

Our winner for this challenge will receive a $20 coupon to spend at the SHOP! Check out all the details HERE.


Sono partita da un cartoncino per acquerello di grammatura abbastanza spessa lungo 19,2 cm e alto 8,9 cm, e con l'aiuto di un Blending Tool ho steso i seguenti Distress Inks, cercando di sfumare ogni nuovo colore in quello precedente.
Lavorate sul lato lungo, dal basso verso l'alto:
- Antique Linen
- Cracked Pistachio
- Broken China
- Salty Ocean
- Stormy Sky
- Black Soot

I have used a 7,5"x 3,5" strip of heavy watercolor cardstock and with the help of a blending tool I have added the following Distress Inks, trying to blend each new colour added with the previous one.
Work on the long side, from bottom to top:
- Antique Linen
- Cracked Pistachio
- Broken China
- Salty Ocean
- Stormy Sky
- Black Soot


Poi ho usato un timbro con l'immagine di alberi e l'ho stampato usando il Distress Oxide Iced Spruce a circa 1 cm dal bordo...poi ho ritimbrato la stessa immagine leggermente sfalsata, usando questa volta un Timbro Archival (resistente all'acqua) di colore nero.

Then I have used a 'Trees'  stamp with Distress Oxide Iced Spruce, at about 1/2 inch from the bottom...then I have stamped again the same image, this time slightly off-set, with an Archival Black Ink. 


Ora è il momento di tagliare in 3 parti la nostra striscia per creare le ATC che ricordiamolo devono essere 2,5 x 3,5 pollici cioè 6,4 x 8,9 cm.
Una volta ritagliate ho ripassato i bordi con Distress Ink Black Soot poi ho ritagliato 3 cerbiatti con una fustella da cartoncino Kraft e li ho incollati sulle ATC insieme a degli alberelli decorativi che avevo da tempo in casa.

Now it's time to cut in 3 parts our strip, in order to create the ATCs, that must be 2,5 x 3,5 inches.
Then I have enhanced the borders using Distress Ink Black Soot...I have used 3 fawn die-cuts and some trees embellishments I had in my stash.


E con questo è tutto...Spero di avervi dato qualche spunto per giocare con noi, vi ricordo che c'è un coupon in palio...fatevi un giro sul BLOG  per vedere anche i fantastici progetti creati dal resto del Team!

That's it...I hope this tutorial gave you some inspiration to join us for the Challenge...remember you can win a $20 coupon...Have a look on the BLOG to see my Team mates amazing projects!

Ci vediamo alla prossima!
See you next time!

Kisses&Hugs!
Simo.

My Winter Blues...


Ciao a tutti! Eccomi di nuovo qui alle prese con la nuova Sfida del Lunedì di SIMON SAYS STAMP - WINTER BLUES...

Hello everyone! Here I am, tackling the new Monday Challenge over at SIMON SAYS STAMP Blog - WINTER BLUES...

Per giocare con la sfida, ho aggiunto dei toni blu alla mia card, ma in realtà mi sono fatta ispirare dalla 'tristezza' invernale...in questi giorni, come per tutti, è arrivato il momento di disfare l'albero di Natale, spegnere le luminarie e le lucine...beh a me tutto questo mette una tristezza infinita...io mi terrei l'albero di natale addobbato tutto l'anno...lucine comprese! Allora ho pensato che avrei potuto creare una card un po' particolare...un po' di luce nei momenti di 'Blues'... 

To play along this Challenge I have added few touches of Blue, but for my inspiration I went for the nostalgic feeling of the end of the holidays...my Winter Blues...
In these days, like for everyone else, came that moment when you have to take off all your ornaments from the Christmas tree, turn off all the lights and such...well this always makes me really sad...I would have my decorated Christmas tree up all year round...lights included! So I thought I could create a special card...just a tiny light for these moments when I get the Blues...


Ho utilizzato le mie nuove thinlits 'Winter Wonderland'  per ritagliare il cerbiatto e creare lo sfondo 'bucherellato', ho ritagliato l'albero da un foglio della collezione 'Destinations' di Tim Holtz, usando la fustella Bigz 'Evergreen', ho infine tagliato varie volte la finestra con la fustella 'Window & Window Box' usando del cartoncino di recupero ed incollando le fustellate tra loro per creare profondità. Poi ho usato i Distress Inks per aggiungere del colore:
- Broken China - Stormy Sky per il cielo
- Peeled paint - Walnut Stain - Ground Espresso per l'albero
- Vintage Photo per il 'Bambi'
- Walnut Stain - Ground Espresso - Black Soot per la finestra
Ho assemblato tutto e ritagliato una striscia di carta dalla collezione 'St. Nicholas Collection' di Graphic 45 - la carta scelta si chiama 'Starry Night'...ovviamente!
Ho creato le pieghe poi ho aggiunto 2 pezzi di washi tape...quello 'brillantinoso' è della serie 'French' di Tim Holtz. Ho fustellato delle stelle e le ho incollate per creare il 'fermo' e tenere la card nella posizione voluta, poi ho aggiunto un paio di 'Clipping stickers'...ora basta aggiungere una Tea-light a batteria ed ecco la magia ha inizio...

 I have used my new 'Winter Wonderland' thinlits dies  to die cut the fawn and to create the 'pierced' background, die-cut the tree with the 'Evergreen' Bigz die, from a piece of paper of Tim Holtz 'Destinations paper stash', last die cut few times some  recycled cardboard with the  'Window & Window Box' Bigz die, and glued the windows together to create some depth.
Used Distress Inks to add colour:
- Broken China -  Stormy Sky for the sky
- Peeled paint - Walnut Stain - Ground Espresso for the tree
- Vintage Photo for  'Bambi'
- Walnut Stain - Ground Espresso - Black Soot for the window
Glued everything together, then cut a strip from Graphic 45 'St. Nicholas Collection' paper pad...the paper used is called 'Starry Night'...of course!
I created the folds for the card, added 2 strips of washi tape...the 'glittered' one is from Tim Holtz 'Frech' bundle. Die cut few stars and glued them together to help the front of the card to stay in place, then added a couple of 'Clipplings stickers'...now it's time to switch a battery Tea Light on and the magic begins...


Presento questa card per le seguenti sfide/I submit this card to the following Challenges:

- SIMON SAYS STAMP MONDAY CHALLENGE BLOG - WINTER BLUES

- HAPPY LITTLE STAMPERS JANUARY ANYTHING GOES WITH DIES CHALLENGE 


Con questo è tutto...grazie per essere passati di qua! Spero che questo progetto vi sia piaciuto...ci vediamo alla prossima!

That's all for now...thank you for popping by! I do hope you enjoyed this project...see you next time!

Kisses&Hugs!
Simo.

venerdì 5 gennaio 2018

SOMETHING PURPLE...SOMETHING NEW...


BUON ANNO!!!! Eccoci già nella prima settimana del 2018...e quale migliore occasione di questa, per divertirsi con le Sfide di SIMON SAYS STAMP?
Il tema di questa prima sfida dell'anno, sia sul Blog del Lunedì che in quello del Mercoledì è 'SOMETHING NEW' - Qualcosa di Nuovo...e per questo progetto ho deciso di usare il mio NUOVO Dylusions Large Creative Journal...che in pratica era ancora imballato dall'anno scorso...

HAPPY NEW YEAR!!! We are in the first week of this 2018, already...so it's the perfect time to have fun with SIMON SAYS STAMP Challenges...
The new theme, both on Monday Challenge Blog and Wednesday Challenge Blog is 'SOMETHING NEW'...hence for this project I have decided to use my NEW Dylusions Large Creative Journal...that was lying unpacked since last year, when I bought it...

A questo punto mi sembra logico che tra i buoni propositi di quest'anno ci sia come primo punto 'USARE TUTTO IL MATERIALE CHE HO IN CASA'...mi conosco....sarà una battaglia persa...Ogni anno inizio con le migliori intenzioni e puntualmente i buoni propositi rimangono disattesi...la cosa più saggia da fare sarebbe 'NON FARE BUONI PROPOSITI'...he he he...quindi ho deciso di dedicare questa prima pagina di questo mio grosso Creative Journal all'unico sensato proposito che posso mantenere...Essere Me Stessa!

At this point I think it's quite safe to say that the first resolution for the new yeart is 'USE ALL THE GOODIES IN YOUR STASH'....but I know better... it's a lost fight...Every year I start as best as I can...good resolutions and all...and give it a couple of months it is all gone...the wisest thing should be to finally state 'NO RESOLUTIONS'...he he he...so I have decided to dedicate this first page of my very large Creative Journal to the one resolution I am willing to keep...Be Myself!


Parlando di cose nuove...Sapete tutti che la Pantone ha decretato il colore 'Ultra Violet' come il colore del 2018...ecco, per non farmi mancare niente ho deciso di buttarmi sul viola, utilizzando lo spray Starburst Witch's Potion Purple della Lindy's Stamp Gang, che ha anche una componente di mica Blu...vi assicuro che non ho mai faticato tanto a fare delle foto decenti per far vedere le varie tonalità cangianti...una cosa pressochè impossibile..comunque...ho aggiunto anche dei tocchi di Acrilico Opal Magic Violet/Green,  per finire con la Metallique Wax Vintage Gold, di Finnabair. Non poteva mancare la mia Paper Doll preferita...

Speaking of new things...You probably know that Pantone decided that the color for 2018 is 'Ultra Violet'...well...I jumped on the Purple Train with this page, using Lindy's Starburst spray Witch's Potion Purple, that has a Blue sparkle in it...I promise you that I have never struggle so much to take a decent picture to show the shimmer...not nearly close...anyway...I also added few touches of Finnabair Opal Magic Acrylic paint Violet/Green and Vintage Gold Metallique Wax as a final touch. Of course I couldn't do it without my favorite Paper Doll...


Con questa pagina partecipo alle seguenti sfide...I submit this project to the following Challenges:

- SIMON SAYS STAMP MONDAY CHALLENGE - Something New

- SIMON SAYS STAMP WEDNESDAY CHALLENGE - Something New

Questo 2018 inizierà con qualche novità...i miei tutorial per il DT di MarteLab ed il DT di Happy Little Stampers - ATC Challenge ...quindi restate in zona...

Grazie per essere passati e, come sempre...ci vediamo alla prossima!

This 2018 will start with a couple of news...my tutorials as DT Member of MarteLab 
and as DT Member of Happy Little Stampers - ATC Challenge... so stay tuned...

Thank you for stopping by and, as always...see you next time!

Kisses&Hugs!
Simo.