giovedì 30 novembre 2017

Shine Brightly...


Ciao a tutti! Bentornati su queste pagine...oggi vi presento il mio primo Traveler's Notebook fatto con la meravigliosa, fantastica, incredibile fustella 'Eileen Hull Journal' di Sizzix...ah quanto ho atteso il momento di poterla utilizzare...e finalmente si è presentata l'occasione!

Hello everyone! Welcome back on these pages...today I want to show you my very first Traveler's Notebook created with the amazing, awesome, game-changing 'Eileen Hull Journal ' XL Die by Sizzix...oh I have waited for the perfect moment to finally use it...and here it is!


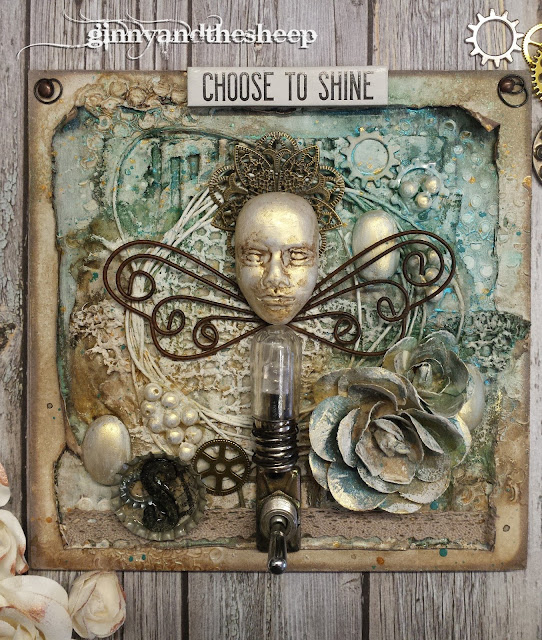
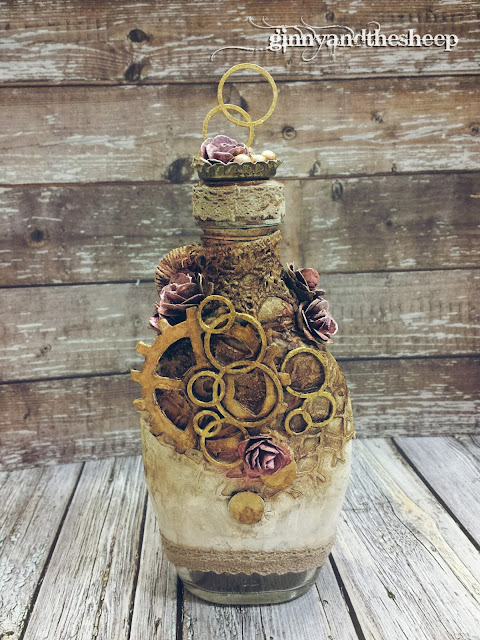
Mi è sempre piaciuta l'idea degli ormai famosissimi 'December's Daily', dove segnare regali, appuntamenti, incollare foto e quant'altro...MA...non sono una 'planner girl' (beh...girl non lo sono più già da un pezzo...Lol!) L'idea di stare lì a segnare, compilare...decisamente non fa  per me...ma ecco l'idea perfetta: Andrea Gomoll - Cre8tive Cre8tions ha deciso di creare un' altro meraviglioso calendario dell'Avvento artistico, ma a differenza dell'anno scorso , ha creato un booklet dove di volta in volta inserirà una pagina decorata con varie tecniche. Allora ho pensato che fosse l'occasione che stavo aspettando ed ho tirato fuori la mia fustellona. Ho deciso di sovrapporre la parte con i fori, in modo da averne solo 2, ho rinforzato bene il dorso con del nastro adesivo e poi ho coperto tutto con Heavy Black Gesso - Finnabair/Prima. Ho steso del Gesso bianco e poi con i colori acrilici e vari stencil ho iniziato a decorare le copertine. Ho poi aggiunto delle timbrate con inchiostri che richiamassero gli acrilici utilizzati, ho incollato delle stelle fustellate con le Framelits 'Primitive Stars' della Sizzix e la scritta 'ART' - fustella della Kesi'Art...su queste parti ho steso la Metallique Wax 'Old Silver' di Finnabair, in modo non perfetto, per dare un tocco invecchiato. Ho aggiunto un'altra deliziosa 'Paper Doll' ed una 'Quote Chip' di Tim Holtz. Per finire ho aggiunto qualche goccia di colla glitter ed ho iniziato ad infilare l'elastico nel dorsino...dal momento che ho tenuto l'elastico più lungo del necessario ho deciso di farlo uscire dal centro e creare così anche la chiusura del Journal...trattandosi della sottoscritta poteva forse mancare un piccolo tocco Steampunk? Ovviamente no...;-)

I have always loved the idea of the famous 'December's Daily' mini album, where you can jolt down ideas for presents, thoughts, pictures and such...BUT...I'm not a 'planner girl' (well...I'm not a girl for some time now...Lol!) The idea of writing, listing...definitely not for me...but there it is the perfect project: Andrea Gomoll - Cre8tive Cre8tions has decided to create another amazing Artsy Advent Calender, but unlike last year's Calendar, she made it into a booklet where to add a new page, in different shape and techniques, each and every day. So I thought it could be the 'daily' I was waiting for and got my XL die at ready. I decided to overlap the holes in the spine to have only 2 of them, added tape for extra sturdiness and covered everything with Finnabair/Prima Heavy Black Gesso. Added also white gesso and with acrylic paints and stencils I decorated the covers...afterwards added few stamping with matching inks and die cuts using Sizzix 'Primitive Starts' Framelits and the word 'ART' by Kesi'Art. Covered the die cuts with Finnabair's 'Old Silver' Metallique Wax, not aiming for a perfect coverage, but more for an antiqued look, Added a lovely Paper Doll and a Quote Chip by Tim Holtz and as final touches, few drops of glitter glue. I started to string the Journal, but as my elastic cord was way longer than necessary, I decided to use the extra lenght for the closure as well, pulling the strings through the hole in the middle of the spine...and as it's me...could I miss the chance to give it a tiny touch of Steampunk? Of course not...;-)


Sulle facciate interne ho incollato delle buste, e poi ho preparato quello che sarà l'Artsy Advent Calendar vero e proprio...

I attached two envelopes on the inside covers, then made my signature, which will be the proper Artsy Advent Calendar...


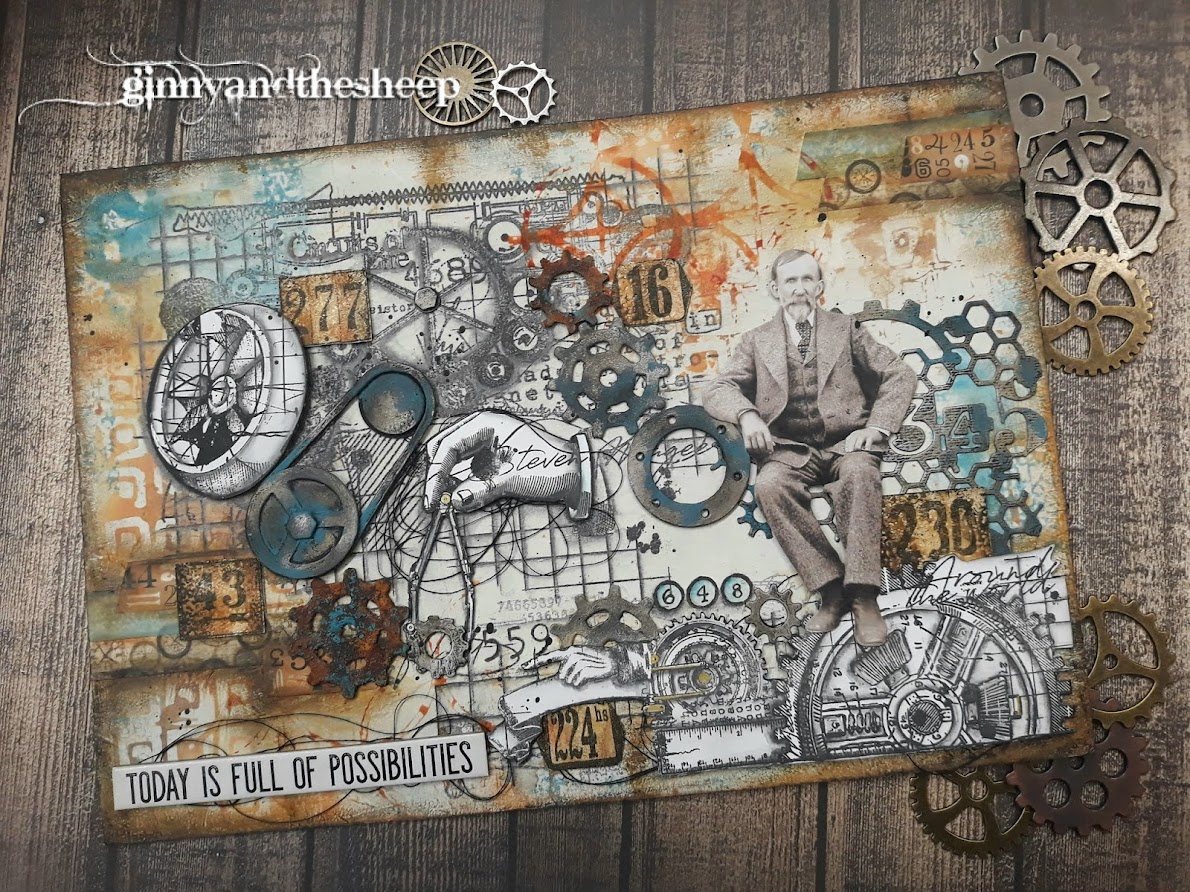
Ho decorato la copertina del libriccino con del washi tape, sul quale ho incollato il negativo di una fustellata ( Evergreen - Sizzix/Tim Holtz Alterations) e per finire un fiocco di neve ricavato con la fustella Mini Snowflake Rosettes - Decorative Strip - Sizzix/Tim Holtz Alterations. 
Per le pagine ho utilizzato dei fogli per acquerello tagliati in varie misure, lo stesso cartoncino della copertina e della carta patterned.

I have decorated the cover of the signature with washi tape, on which I glued the negative of a die-cut (Evergreen Die - Sizzix/Tim Holtz Alterations) and then added a snowflake rosette die cut with the Mini Snowflake Rosettes - Decorative Strip Die - Sizzix/Tim Holtz Alterations.
For the pages I have used watercolor cardstock cut in different lenghts, the same cardstock of the cover and some patterned paper.


Presento questo progetto per le seguenti sfide / I submit this project to the following challenges:


  (Showcasing Tim Holtz Products: Honeycomb Layering Stencil, Dapper Stamp Set, Idea-ology 
   'Paper Dolls', Idea-ology 'Quote Chips', Evergreen BIGZ Die, Mini Snowflake Rosettes Decorative
   Strip Die)


E con questo è tutto...anche per il mese di Novembre...grazie per essere passati! Ci vediamo alla prossima!

This is it...and it's also the end of November, already! Thank you for stopping by...see you next time!

Kisses&Hugs!
Simo.


martedì 21 novembre 2017

Always be Thankful...


Ciao a tutti e bentornati! Oggi voglio condividere con voi il mio primo Layout 30x30...che io non sia una scrapper non è una novità...ahimè! Ovviamente rimango sempre a bocca aperta quando mi capita di vedere i LO di scrappers esperte, pieni di layers, fustellate, timbrate, stickers...io ho ancora tanta e tanta strada da fare, ma, come prima volta diciamo che non mi dispiace!
Volendo fare un progetto che si adattasse ad alcune sfide, ho cercato di utilizzare colori e materiali consoni a quanto richiesto...quindi una bellissima carta 'effetto legno' della Simple Stories, Sprays e Magicals della Lindy's, cartoncino 'strappato e distressato', fustellate di foglie, qualche piuma ed una  foto scattata durante una gita al Lago di Varna, in Alto Adige!
Questa combo di colori mi parla subito di Autunno, che, ormai lo sanno anche i sassi, è la mia stagione preferita...con i suoi colori caldi, i profumi, l'aria frizzante...tutto racchiuso in questa foto...una bellissima giornata, cielo terso, il sole che rendeva i colori ancora più spettacolari...il profumo di camini accesi e caldarroste nell'aria, il rumore delle foglie sotto le scarpe, un senso di pace ed armonia...si...adoro anche l'Alto Adige ed i suoi bellissimi panorami!!!

Hello everyone and welcome back! Today I want to share with you my very first 12"x12" Layout...I'm definitely not a scrapper...unfortunately, and everytime I see those beautiful, multilayered layouts, full of die-cuts, stamps, stickers, I am always in awe...there is still a lot of work to do, but, as my very first time, let's say I'm quite pleased!
As I wanted to submit this project to a number of different challenges, I tried to use colors and materials as requested...so a beautiful 'wood effect' paper by Simple Stories, Sprays and Magicals by Lindy's, some teared-up and distressed cardstock, die-cut leaves and feathers and a picture taken during a day-trip to Varna Lake, in South-Tyrol!
This colors combo speaks to me of Fall, which is by far (as you may know) my favorite Season...with its warm colors, smells, crisp air...all the above is comprised in this picture...a beautiful day, clear sky, the sun making all the colors even more spectacular and intense...the smell of lit fireplaces and roasted chestnuts in the air, the sound of leaves under our shoes, a feel of peace and harmony...yes...I love South Tyrol and those landscapes too!!!


Per prima cosa ho steso del gesso diluito, poi ho spruzzato vari sprays e Magicals (l'elenco lo trovate in fondo al post) e fatto cadere delle gocce qua e là. Ho asciugato ed aggiunto delle timbrate con inchiostro nero Archival, ho timbrato delle foglie con Distress Oxide Walnut Stain ed embossato con Polvere da Embossing trasparente. Ho colorato le foglie così ottenute sia con i Magicals che con i Gelatos metallici. Ho spruzzato le fustellate sempre con gli spray della Lindy's, ho preso un cartoncino stampato con il mio Gelli plate e l'ho strappato in due parti...su una ho steso il Distress Oxide Spiced Marmalade, mentre sull'altra il Wilted Violet, poi ho fatto cadere delle gocce di acqua e di inchiostro. Ho rovinato i bordi e li ho ripassati con Black Soot.
Ho assemblato il tutto, aggiungendo dello spago e poi ho ritagliato la scritta 'THANKFUL' da un pezzo di sughero, usando le fustelle Thinlits 'Alphanumeric' di Sizzix/Tim Holtz , e poi l'ho mattato con del cartoncino nero.
Come ultimo tocco ho rovinato con le forbici i bordi del foglio e li ho ripassati con il Distress Ink pad Black Soot.

First of all layered with diluted gesso, then added colors with Sprays and Magicals (you'll find the list at the end of this post), and spattered here and there. Dryed and stamped with Black archival ink, stamped also few leaves using Distress Oxide Walnut Stain and embossed with Clear Embossing Powder. Painted those leaves using Magicals and metallic Gelatos. Used sprays also on the die-cuts, finally got to use a print made with my Gelli plate...tore it in two...on one used Distress Oxide Spiced Marmalade and Wilted Violet on the other, then spattered with water and inks. Distressed and aged the borders using Black Soot.
Glued everything together, adding some string and die-cut the word 'THANKFUL' using 'Alphanumeric' Thinlits dies by Sizzix/Tim Holtz,  on a piece of cork, then based it with black cardstock. As final touch I distressed all the borders with scissors and then aged with Black Soot Distress Ink.


 Presento questo Layout per le seguenti sfide.../ I submit this LO to the following Challenges...

- LINDY'S NOVEMBER CHALLENGE


 Colori usati / Colors used:

- FLAT FABIO - GREASED LIGHTNIN' GREEN
- MOON SHADOW MIST - MYSTIC MALACHITE
- MOON SHADOW MIST - PIRATE'S PLUNDER GOLD
- STARBURST - CALIFORNIA POPPY GOLD
- STARBURST - RED HOT POKER ORANGE
- MAGICAL - STEAMPUNK SEPIA
- MAGICAL - PRIMA DONNA PURPLE
- MAGICAL - GLORY OF THE SEAS GOLD


- MORE THAN WORDS NOVEMBER 2017 CHALLENGE: 'OUTDOORS & WOODGRAIN'

WORD INSPIRATION: OUTDOORS
CREATIVE CHALLENGE: WOODGRAIN


- SIMON SAYS STAMP MONDAY CHALLENGE: TEAR IT UP


- TEAR SOMETHING AND ADD IT TO YOUR CREATION...


Grazie per essere passati di qua...ci vediamo alla prossima!

Thank you for your visit...see you next time!

Kisses&Hugs!
Simo.

Always be Thankful...


giovedì 16 novembre 2017

It's a Stiched up Christmas...


Ciao a tutti! Finalmente eccomi tornata alla Sfida settimanale del Lunedì di SIMON SAYS STAMP...ho saltato le ultime settimane e mi sono sentita in colpa...Lol! Sono doppiamente felice di questa card, perchè FINALMENTE ho preso il coraggio a due mani ed ho tirato fuori la mia macchina da cucire e..Voilà...sono riuscita a fare una cucitura su carta e tela, senza problemi! Bello sforzo direte voi...che ci vuole? Ebbene...io faccio veramente pena quando si tratta di cuciture, e non c'è volta che non rompa il filo tipo 10 volte di seguito, così finisco per cucire a mano che faccio prima. Oggi invece, San Cucirini mi ha graziato ed ho realizzato la mia prima card cucita...storta, ma fatta senza danni...eh...sono le piccole gioie! ;-)

Hello everyone! Finally I'm back with a Monday Challenge over at SIMON SAYS STAMP Blog...I missed the last few weeks...and started to feel guilty...Lol! I'm so proud of this card because, FINALLY, I have been brave enough to take my sewing machine out and actually stich on paper and burlap, without any problem at all! Well..duh...some of you might think but the truth is...I really suck at sewing with the machine, like I have to change thread at least 10 times in a row because it breaks on me, so I usually tuck the sewing machine away again, slightly cursing under my breath, and do the stiching by hand. But Today everything went smoothly so here it is...my stiched card...definitely wonky, but nonetheless stiched...what can I say...it's all about the little things! ;-)


Dopo aver cucito i supporti, ho steso in maniera molto leggera del gesso bianco qua e là, ho asciugato e poi ho steso il gesso trasparente su tutta la superficie. Ho aggiunto dei dettagli con la modeling paste e lo Stencil 'Holiday Script' di Tim Holtz. Ho asciugato di nuovo molto bene ed ho iniziato a spruzzare con i miei fidati Lindy's: 'California Poppy Gold' Starburst e 'Pirate's Plunder Gold' Moon Shadow mist, ho asciugato e poi ho fatto cadere delle gocce di sprays Flat Fabio 'Rizzo's Rowdy Red' e 'Greased Lightnin' Green' . Ho accentuato le scritte con il Distress Crayon Vintage Photo, poi ho rovinato i bordi del foglio con le forbici e li ho ripassati prima con Distress Ink Ground Espresso e poi l'immancabile Black Soot.
Per completare la card ho aggiunto delle fustellate di foglie (Thinlits Mini Holiday Greens - Sizzix/Tim Holtz Alterations), una candela ritagliata con la fustella 'Candlelight' BIGZ Sizzix/Tim Holtz Alterations e colorata con Distress Oxide Antique Linen, Distress Inks Vintage Photo, Ground Espresso e Black Soot e Distress Stain Tarnished Brass. Per ultima ho aggiunto la scritta 'PEACE' ritagliata da cartoncino rosso, con le Thinlits 'Vintage Tidings' Sizzix/Tim Holtz Alterations e poi spruzzata con Starburst 'Poinsettia Red Gold' della Lindy's. Ho mattato il tutto su cartoncino nero, e la mia prima card natalizia di quest'anno è pronta!

After stiching together paper and burlap, I have added few gentle touches of white gesso here and there, dried then painted everything with clear gesso. Added few details and words with modeling paste and Tim Holtz stencil 'Holiday Script'. Dried once again then started adding color with Lindy's sprays: 'California Poppy Gold' Starburst and 'Pirate's Plunder Gold' Moon Shadow mist, dried then added few drops of Flat Fabio sprays 'Rizzo's Rowdy Red' and 'Greased Lightnin' Green' . 
Enhanced the words with Distress Crayon Vintage Photo, then distressed the borders of the paper with scissors and added Distress Ink Ground Espresso and, of course,  Black Soot.
To finish the card added few die-cut leaves from Mini Holiday Greens Thinlits - Sizzix/Tim Holtz Alterations, a candle cut with 'Candlelight' BIGZ Die - Sizzix/Tim Holtz Alterations and painted with Distress Oxide Antique Linen, Distress Inks Vintage Photo, Ground Espresso and Black Soot and Distress Stain Tarnished Brass. Last the word 'PEACE' cut from red cardstock using 'Vintage Tidings' Thinlits -  Sizzix/Tim Holtz Alterations, then sprayed with Lindy's Starburst 'Poinsettia Red Gold' .
Pasted everything on black cardstock and my first Christmas card of this year is ready!

Alcuni dettagli....Few details...


Presento questa card per la seguente sfida / I submit this card to the following challenge:


Eccoci alla fine di questo post...vi ringrazio di essere passati di qua! Ci si vede alla prossima...

Here we are at the end of this post...Thank you for stopping by! See you next time...

Kisses&Hugs!
Simo.


lunedì 13 novembre 2017

Top 5 at the SASPC October Challenge!

Ciao a tutti...piccolo post autocelebrativo...Lol!
Sono molto felice di essere stata scelta tra i Top 5 sul Blog di SanDee & Amelie's Steampunk Challenges, per il mese di Ottobre, con questo progetto...

Hello everyone...just a short post to thank the guys at SanDee & Amelie's Steampunk Challenges blog for the Top 5 for the October Challenge, with this project...so proud!!!

Cliccate sulla foto per andare al relativo post - Click on the pic to go to the post


SASPC blog


Ok...torno ai miei lavori...a presto!

Ok...now back to work...see you soon!

Kisses&Hugs!
Simo.

sabato 4 novembre 2017

Brilliant Decoration...


Ciao a tutti e bentrovati! Eccomi arrivata allo Stage n.4 del Progetto Creative Art sul blog di Mixed Media & Art...'Brilliant Decoration'...

Hello and welcome back! Here I am at Stage 4 of the Joint Project 'Creative Art' on Mixed Media & Art Blog...'Brilliant Decoration'...

Per quest'ultimo progetto è stato richiesto l'uso di un pezzo di Bigiotteria, sempre non relativo a materiale Scrap, e l'altro elemento fondamentale è 'Shine', in ogni sua forma e quantità...io sono partita da questo braccialetto...

For this last project it was mandatory to use a piece of Bijouterie, not from scrap material, and the other element was 'Shine', in any form and quantity...I started from this bracelet...


Chiedo scusa per la pessima qualità della foto...avrò questo braccialetto da almeno 20 anni, uno dei tanti finiti nel mio bauletto delle 'chincaglierie'...ho cercato quindi di dargli una nuova vita, inglobandolo in questo mio progetto...

I apologize for the poor quality of this pic...I have this bracelet for almost 20 years, one of many tossed in my 'trinckets bin'...so I tried to give it a new purpose, using it in this new project...


Ho aggiunto vari elementi per creare una texture, usando il Soft Matte Gel per incollarli...ho incluso anche dei numeri, 1,2,3 e 4, per simboleggiare i 4 Stadi di questo Progetto Creativo...per la parte 'Shine', dopo una bella mano di Heavy Black Gesso ho spruzzato vari Lindy's, sia Starbursts che Moon Shadow Mists ed una volta asciutti mi sono divertita ad aggiungere dei tocchi di luce con le cere Metallique ed Opal Magic...profumate e goduriose!!!
Per completare, ho incollato vari strass e poi dei glitter...ed ecco il mio cuore in tutta la sua 'Brillantinosa' bellezza!

I added various elements to create texture, using Soft Matte Gel to stick them down...in the lot I added also the numbers, 1,2,3 and 4, to simbolize the 4 Stages of this Creative Project...for the 'Shine' part, after covering everything with Heavy Black Gesso, I sprayed with few Lindy's, both Starbursts and Moon Shadow Mists and once dry I had so much fun to add more touches of light and shine with Metallique and Opal Magic waxes...they smell so good and they are gorgeous!!!
As finishing touches added rhinestones and glitters...and here it is, my heart in all its 'Shining' glory!


Ed ecco dove è finito il mio braccialetto...That's where my bracelet ended up...


Ecco tutti i 4 Stadi del Progetto 'Creative Art'...

Here's all the 4 Stages of the Joint Project 'Creative Art'...

STAGE 1 - MECHANICAL EXPLOSION

cliccate sulla foto per andare al mio post - click on the pic to go to my post


STAGE 2 - CRYSTAL BEAUTY

cliccate sulla foto per andare al mio post - click on the pic to go to my post


STAGE 3 - THE BREATH OF NATURE

cliccate sulla foto per andare al mio post-  click on the pic to go to my post


STAGE 4 - BRILLIANT DECORATION


E con questo si conclude questo mio viaggio Creativo di Mixed Media & Art...grazie per essere passati...alla prossima!

So this is how ends this journey with Mixed Media & Art 'Creative' project...thanks for stopping by...see you next time!

Kisses&Hugs!
Simo.