

Hello my friends and
welcome back! This is my last week as Guest Designer at SIMON SAYS STAMP MONDAY CHALLENGE BLOG...it has been a wonderful
experience, and I thank everyone from the bottom of my heart for
making me feel so welcome...it meant the world to me!!!
And now...let's get
ready for the New Challenge!
Ciao a tutti amici miei e bentornati!
Questa è l'ultima settimana come Guest Designer per il SIMON SAYS STAMP MONDAY CHALLENGE BLOG...è stata un'esperienza
meravigliosa, e ringrazio davvero tutti dal profondo del cuore per
avermi fatta sentire benvenuta...ha davvero significato tanto per
me!!!
Ed ora...prepariamoci per la Nuova
Sfida!

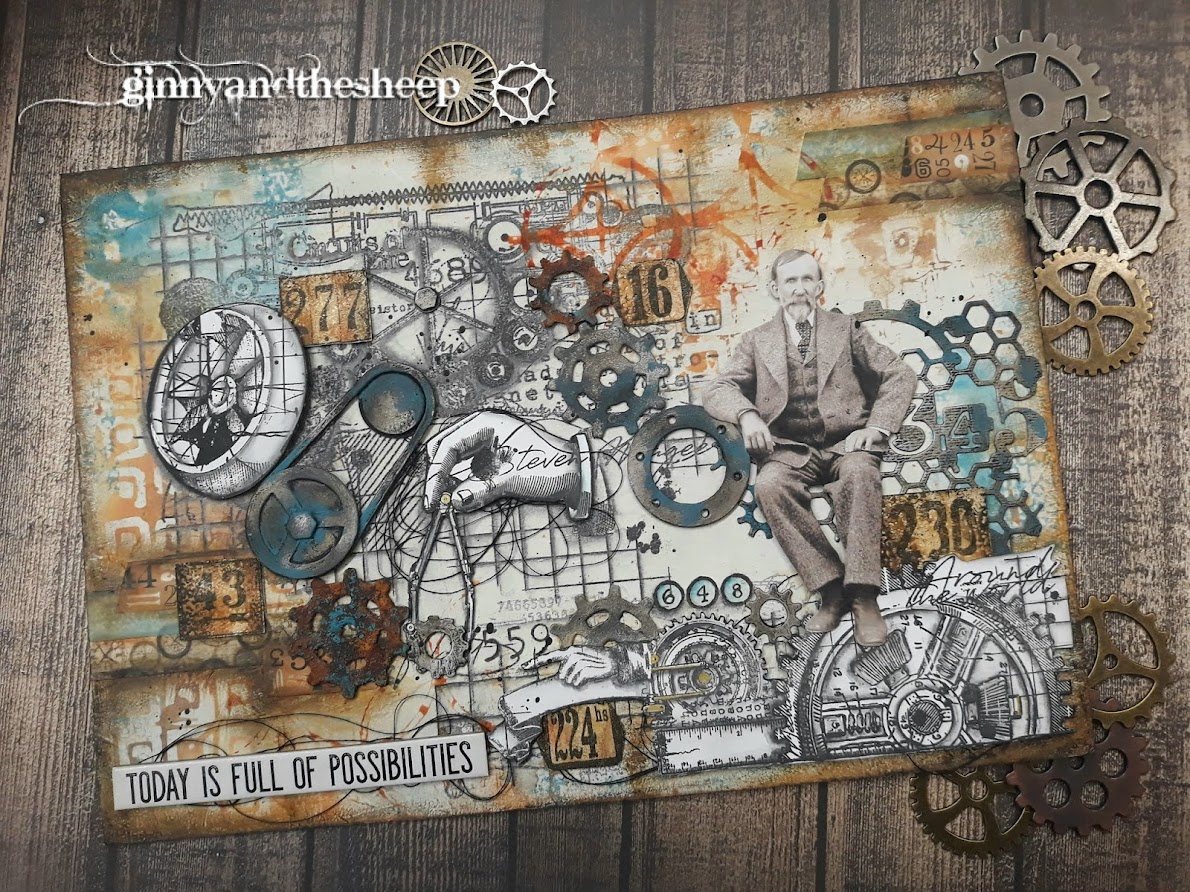
This week's theme is
STUDY/SCHOOL RELATED, so I decided to make a Shadow Box, with
a vintage feel...I love love love Shadow boxes, and made a few during
last year's challenges, so stick with me and let's do it! As usual, the
supplies used and available at SIMON SAYS STAMP STORE are
listed at the end of the post.
Il tema di questa settimana è
STUDY/SCHOOL RELATED, così ho deciso di fare una Shadow Box
dal sapore vintage...Io adoro le Shadow Box e ne ho fatte alcune nel
corso delle sfide dell'anno scorso, quindi restate con me e diamoci
da fare! Come al solito il materiale usato e disponibile nello STORE di SIMON SAYS STAMP lo trovate elencato alla fine del post.

I started with a 6x6
inches sheet of paper from my stash, as you can see from the picture
I made few trials first using scraps of paper: I used the 2 smaller
' Sized Rectangles Movers & Shapers' for my cut-outs (You will
need the Base Tray for this step)
I covered the paper
with a wash of White Gesso, next spread some Texture Paste Crackle
through the TYPO stencil and set aside to dry.
Ho iniziato con un foglio di carta
patterned 6x6 pollici dalla mia collezione, come potete vedere dalla
foto ho fatto varie prove usando fogli di carta comune...per le mie
aperture ho usato le 2 misure più piccole dei Sized Rectangles
Movers & Shapers (per questo step avrete bisogno anche del Base
Tray magnetico).
Ho coperto il foglio con del gesso
bianco molto diluito, poi ho aggiunto un po' di movimento usando la
Texture Paste Crackle e lo stencil TYPO. Ho messo da parte ad
asciugare


While the paste was
drying I stamped the images I needed using StazOn Jet Black Ink...to
color them I used Distress Crayons and a water-brush to lift the
color straight from the crayon...TIP dry between layers and go back
with more of the same color to have a bolder look.
APPLE: covered with
Antique Linen, then Fossilized Amber leaving a tiny space as 'light',
colored also the leaf. Peeled Paint mainly on the left side, the
bottom and the leaf. Vintage Photo on the stalk, on
the traced shadows of the image, on the base of the leaf. Shadow all
around the apple with Hickory Smoke, then deepen the shadows with
Black Soot.
GLOBE: Antique Linen on
the globe, then Fossilized Amber, then Peeled Paint on the 'land'
part, Vintage Photo to shadow all around where the water is. Walnut
Stain on the stand then shadow all around with Hickory Smoke and
Black Soot.
BOOKS: Antique Linen on
the pages, Fossilized Amber to darken the pages and on the first
book from top. Peeled Paint on the second book, Vintage Photo on
third and fifth books and to deepen the shadows on the pages, Hickory
Smoke on the fourth book, Walnut Stain to shadow pages, above and
under the books, then shadow all around with Hickory Smoke and Black
Soot.
Then tapped lightly
into Distress Micro Glaze and rub it onto the colored images, shadows
included, to create a 'resist' effect...remember not to use too much glaze!
Nel frattempo ho timbrato
le immagini che mi servivano con lo StazOn Jet Black...per colorarle ho usato i Distress Crayons ed un
pennello a serbatoio, prelevando il colore direttamente dal
Crayon...CONSIGLIO: asciugate dopo ogni strato e ritornate con lo
stesso colore per un'effetto più pieno ed intenso.
MELA: colorare prima con
Antique Linen, poi Fossilized Amber lasciando uno spazio come 'luce',
colorare anche la foglia. Con Peeled Paint colorare la parte sinistra
ed in basso della mela e la foglia, lasciando intravedere un po' del
colore precedente. Vintage Photo per il picciòlo, sulle ombre
'tratteggiate' del timbro ed alla base della foglia. Ombreggiare
tutto intorno alla mela con Hickory Smoke, poi accentuare l'ombra
con Black Soot.
GLOBO: Antique Linen sul
globo, poi Fossilized Amber, Peeled Paint dove ci sono i continenti,
Vintage Photo per ombreggiare intorno, dove c'è l'acqua. Walnut
Stain sulla struttura, poi ombreggiare tutto intorno con Hickory
Smoke e Black Soot.
LIBRI: Antique Linen sulle
pagine, Fossilized Amber per scurirle e sul primo libro in alto.
Peeled Paint sul secondo libro, Vintage Photo sul terzo e sul quinto,
per scurire le ombreggiature dei vari libri e sulle pagine, Hickory
Smoke sul quarto libro, Walnut Stain per ombreggiare pagine, sopra e
sotto i libri, poi ombreggiare tutto intorno con Hickory Smoke e
Black Soot.
Poi ho passato leggermente il dito
nella Distress Micro Glaze e l'ho strofinato sulle zone colorate,
ombre incluse, per creare un'effetto resist...attenzione a non usare troppa glaze!


I stamped also the
numbers from the DAPPER set, then cut to the right size all the
images and aged them using Distress mini Inks Vintage Photo, Walnut
Stain and Black Soot, with a Mini Blending Tool. Lot of
spritzing&flicking too! (You know it's one of my favorite
techniques, right?)
Ho stampato anche i numeri dal set
DAPPER, poi ho ritagliato tutto a misura ed invecchiato usando i Mini
Distress Inks Vintage Photo, Walnut Stain e Black Soot, aiutandomi
con il Mini Blending Tool...Ovviamente anche molto 'spritz&flick'!
(Ormai lo sapete che è una delle mie tecniche preferite, no?)

Now it's time to color
the base...I have used Distress Oxide inks and the blending tool,
starting with Antique Linen, then Peacock Feathers, dried, spritzed
with water, dried again, then Broken China and Antique Linen to mute
the color down a bit. Added Vintage Photo and spritzed and dried
again. Used Black Soot Distress Ink all around the edges, openings included.
Ora è il momento di
riprendere in mano la base...Ho usato i Distress Oxide inks con il
blending tool, iniziando con Antique Linen, poi Peacock Feathers, ho
asciugato, spruzzato con acqua ed asciugato ancora, poi Broken China
e Antique Linen per smorzare un po' il colore troppo acceso. Poi ho
aggiunto Vintage Photo, spruzzato ed asciugato. Con il Distress Ink
Black Soot ho ripassato tutti i bordi, compreso quelli delle
aperture.

I cut a piece of scrap
paper down to 6X6 inches, then after checking the right placement, I have
glued with Glossy Accents all the rectangles in place, adding some
recycled cardboard underneath, for dimension. Then added dimension to the base
too and stuck in place. As final touches, added few die-cuts, both
letters and numbers...I cut them out several times then glued together, to have a more dimensional look. Distressed the edges with
Black Soot D.I. and attached them using the ever-faithful Glossy
Accents. I had an old pencil in my stash, so I run it through a pencil-sharpener A
LOT, to have the right size, then painted with black gesso and added
some twine. Glued in place.
Ho preso un pezzo di
carta, tagliato a misura 6x6 pollici, poi controllando il corretto
posizionamento, ci ho incollato sopra i vari pezzi con il Glossy
Accents, aggiungendo spessore con dei pezzi di cartone riciclato.
Nello stesso modo ho aggiunto dimensione anche alla base e l'ho
incollata sopra al tutto. Come ulteriore decorazione, ho ritagliato
varie volte delle lettere e dei numeri, ed incollato fra loro i vari
strati, poi con il Black Soot ho ripassato i bordi ed ho incollato
tutto con il fidato Glossy Accents. Per ultimo ho preso una vecchia
matita e con il temperamatite l'ho fatta diventare della misura
giusta. L'ho dipinta con gesso nero, ho aggiunto del baker's twine ed
attaccata in posizione.

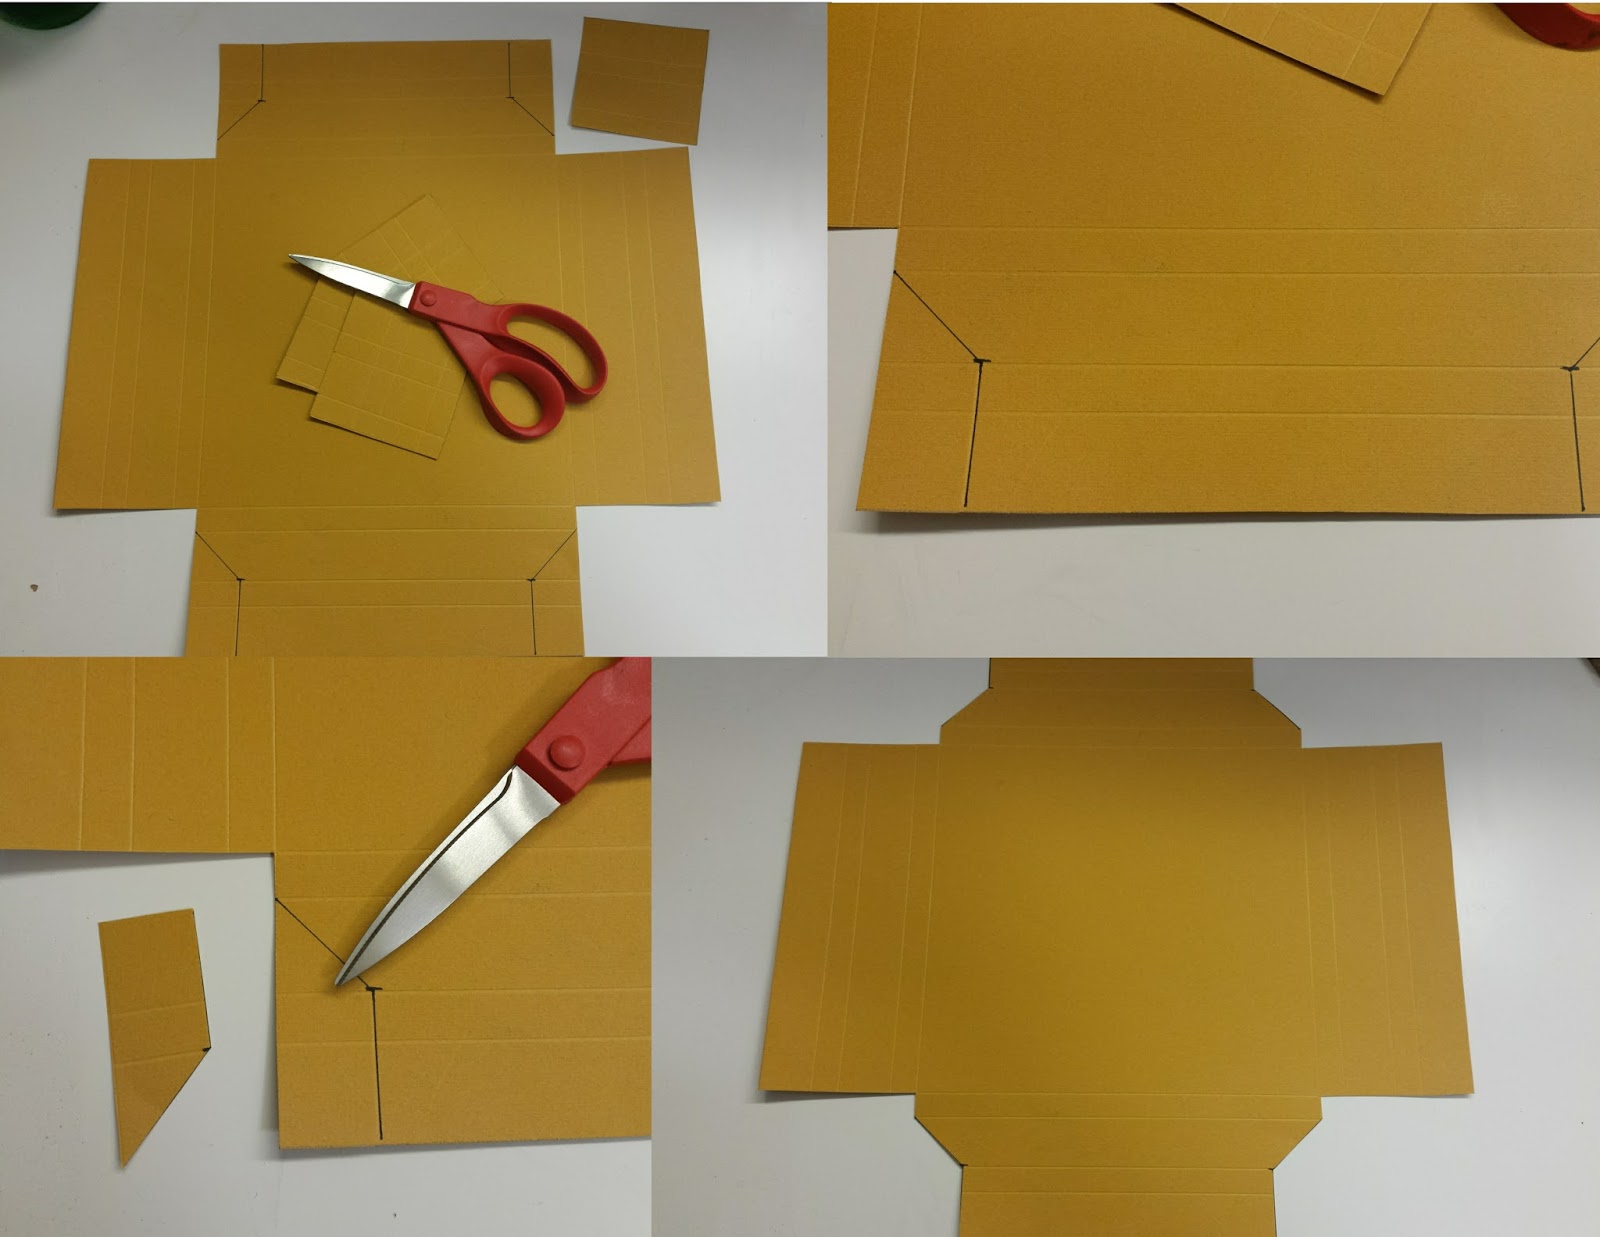
And now...let's build up the Shadow Box! (please use the picture below as reference). I have used
heavy cardstock, but not too thick or you will have problems when
scoring...
Cut a piece of paper
measuring 14x14 inches, and do the following scores: at 1 inch, 1 ½
inches, 2 ½ inches, 3 inches...repeat on all 4 sides.
Cut out the four
corners...Then only on two sides (one at the opposite of the other)
score at 1 inch down ONLY until the second score line below, do this
on both ends, then turn the paper at the opposite side (at 180
degrees) and repeat.
Now from the above
mentioned new score lines, draw a line sideways down to the corner of
the next score line (you will see in the pic that I draw these lines
with a pen, for better understanding) and cut out that piece. Repeat
for the other three '1 inch new score lines'. Really it's easier
doing it than explaining...
Ora costruiamo la Shadow
Box! (Usate la foto sotto come riferimento) Io ho usato del
cartoncino pesante, ma non troppo rigido oppure avrete dei problemi
con le pieghe.
Partiamo da una base di
14x14 pollici e tracciate le seguenti pieghe: a 1 pollice, 1 pollice
e mezzo, a 2 pollici e mezzo e a 3 pollici...ripetete anche sugli
altri lati.
Tagliate via i quattro
angoli...Ora scegliete 2 lati (uno all'opposto dell'altro) e fate una
piega a 1 pollice giù SOLO fino alla seconda linea ...ripetete anche
sull'altro lato, poi girate il foglio sul lato opposto (180 gradi) e
ripetete.
Da queste nuove 'score
lines' tracciamo una linea diagonale fino all'angolo della score line
subito sotto (sulla foto qui sotto vedrete queste linee segnate a
penna, per maggiore chiarezza) e ritagliate questo pezzo. Ripetete
anche per le altre 'nuove linee' che avete tracciato...Davvero è più
facile a farsi che a spiegare il procedimento...
Now all you have to do
is to crease well the scored lines, then attach double sided tape on
the outside edges and start to fold : do the long sides first...start
with one, be sure to attach it straight and press down a bit to glue
it well, then the other one. Now fold the short ones. When everything
is in place put some glue in the fold lines at the corners to stick
them down...let dry.
Ora non resta che piegare
bene le linee, attaccare del biadesivo sui lati esterni ed iniziare a
ripiegare i lati...iniziate dai lati lunghi...ripiegatene uno,
facendo attenzione ad attaccarlo dritto, premete per incollarlo bene
e passate all'altro. Poi fate i lati corti. Una volta che è tutto
perfettamente incastrato, mettete un poco di colla negli angoli per
fissarli e fate asciugare.

I decided for a Vintage
look for the box also, so using Soft Gel I glued some Tissue Wrap Paper to
cover up the borders, the inner ones too...set aside to dry.
Ho deciso per un look
Vintage anche per la scatola, quindi con il Soft Gel ho incollato del
Tissue Wrap, coprendo bene i bordi, anche quelli interni...ho fatto
asciugare bene.

Added a wash of white
gesso, then some texture with modeling paste and TYPO and INDUSTRIAL
stencils. Afterwards used Distress Oxides inks: Antique Linen,
Peacock Feathers, Vintage Photo, spritzed with water, lift off excess
water and color with a paper towel and dried. Went back with Vintage
Photo then Black Soot on all the edges.
Smudged Distress Crayons
Vintage Photo and Black Soot over the raised parts, then put some
double sided tape under the decorated base and attached it to the
middle of the box.
Put some twine on the
upper side, then glued a Quote chip with Glossy Accents. Added pieces
of scrap cardboard to the Paper Dolls and glued them down, then glued
together a piece of scrap fabric and paper and attached another Quote
chip on top of that, to finish my piece...and there it is...my
Vintage 'Back to School' Shadow Box...
Ho aggiunto del gesso
bianco diluito, poi un po' di texture con modeling paste e gli
stencils TYPO e INDUSTRIAL. Ho colorato la cornice con i Distress
Oxides: Antique Linen, Peacock Feathers, Vintage Photo, spruzzato con
acqua, tolto eccesso acqua e colore con un pezzo di carta ed
asciugato. Ho aggiunto altro Vintage Photo e poi Black Soot su tutti
i bordi.
Ho sporcato con i Distress
Crayons Vintage Photo e Black Soot le parti in rilievo, poi ho
aggiunto del biadesivo sotto alla nostra base 6x6 e l'ho incollata in
mezzo alla cornice.
Ho fatto qualche giro di
baker's twine sul lato in alto e l'ho fermato con il Glossy Accents
ed una Quote Chip. Ho incollato dei pezzi di cartone sul retro delle
Paper Dolls, sempre per aggiungere spessore, e poi ho attaccato tutto
alla Shadow Box...per finire ho mattato un'altra Quote Chip con dei
ritagli di tela e di carta ed incollato al suo posto....ed eccola
qui...la mia Shadow Box Vintage per il rientro a scuola...


Hope you enjoyed this
project as much as I did while creating it, please do check this
Amazing Design Team for
further inspiration! We look forward to see what
you'll create, remember that you could win a $50 voucher to spend in
Simon Says Stamp Store, so..now it's up to you!
You have until Monday 8:00 am Ohio time, 1:00 pm UK time, 2:00 pm CET
to join the fun!
Spero che vi sia piaciuto questo
progetto, io lo ammetto, mi sono divertita parecchio nel crearlo...Mi
raccomando andate a prendere spunto ed ispirazione dall' Incredibile Design Team! Non vediamo l'ora di vedere le vostre
creazioni e ricordate che potreste vincere un voucher di $50 per i
vostri acquisti da Simon Says Stamp, quindi...adesso tocca a
voi!
Avete tempo fino a Lunedì alle 8:00 am
Ohio, 13:00 UK, 14:00 CET per postare i vostri lavori!


What you'll need / Materiale utilizzato:
 |  |  |  |  |  |
 |  |  |  |  |  |
 |  |  |  |  |  |
 |  |  |  |  |  |
 |  |  |  |  |  |
 |  |  |  |  |  |
 |

It's time to say goodbye, and I do want to thank Simon Says Stamp and Lols once again, for this amazing month, and all the Design Team for being such a supporting and amazing group, and an awesome inspiration every single week...Now, all I have to say is..See you next time...
E' tempo dei saluti, e voglio di nuovo ringraziare Simon Says Stamp e Lols per questo fantastico mese, nonché tutto il Design Team, per essere un gruppo incredibile ed una fonte inesauribile di ispirazione una settimana dopo l'altra...Ed ora non mi resta che dirvi...Ci vediamo alla prossima...
Kisses&Hugs!
Simo.


