Ciao a tutti e Bentornati! Qualche tempo fa ho avuto
l'incredibile fortuna di vincere il primo Give-away organizzato da
STAMPERIA sulla
loro pagina Facebook...si lo so...stento ancora a
crederci!
Conosco bene i prodotti di Stamperia
già da qualche anno ed è stato un vero piacere quando mi hanno
chiesto di preparare un progetto per loro...e questo è il risultato!
Hello everyone and Welcome back! Sometime ago I was
so incredibly lucky to win the first Give-away by STAMPERIA on their Facebook page...I know, I know...still can't believe it!
I know Stamperia
products for few years now, and has been a great pleasure when I have
been asked to create a project for them...and this is the result!
Ecco quello che vi occorre per fare
questa Mega Tag insieme a me...
Here's what you need to make this
Mega-Tag with me...
STAMPERIA Blocco di carta 'Herbarium
Collection' 30x30 cm
'Herbarium
Collection' 12”x12” Paper Pad...cod. SBBL29
STAMPERIA Cartoncino Rosso 30x30cm/Red
Cardstock 12”x12”..cod. SBU051
STAMPERIA Set Biglietti a 3 ante/3
Folds Cards Set..cod. SBC04
STAMPERIA Media Stencil Rete
Ondulata/Wavy Mesh...cod. KSTD011
STAMPERIA HD Stamps Butterflies and
Tags..cod. WTKCC65
STAMPERIA HD Stamps
Crackle...cod. WTKCC39
STAMPERIA Acrylic Stamps Love
Life...cod.
WTK117
STAMPERIA Wooden Shapes
'Herbarium'..cod.
KLSP031
STAMPERIA
Locks...cod. SBA35
STAMPERIA Filo Cerato Rosso/Red
Waxed Thread..cod. FLFCR
STAMPERIA
Merletto/Lace..cod.
NSP02
STAMPERIA Media Gloss
Paste...cod. K3P39
STAMPERIA Crackle Paste
White..cod. K3P37
STAMPERIA Patina Anticante Ombra/Aged
Looking Patina Shadow...cod. K3P16M
STAMPERIA Colla Punta Fine/Fine Tip
Glue...cod. DC09
STAMPERIA Stamp Pad 2,5x2,5
Senape/Mustard..cod.
WKP30P
STAMPERIA COLORI ACRILICI / ACRYLIC
PAINTS:
ALLEGRO Rame Metallico/Metallic
Copper...cod.
KAL117
ALLEGRO Verde Brillante/ Shiny
Green...cod. KAL31
ALLEGRO
Bianco/White...cod. KAL11
AQUACOLOR
Pino/Pine...cod. KE34A
AQUACOLOR SPRAY
Acquamarina/Aquamarine..cod. KAQ015
AQUACOLOR SPRAY
Turchese/Turquoise...cod. KAQ018
AQUACOLOR SPRAY
Cuoio/Leather...cod. KAQ004
AQUACOLOR SPRAY
Rosso/Red...cod. KAQ009
Gesso Trasparente / Clear Gesso
Inchiostro Permanente Nero / Black
Archival Ink
Inchiostro Permanente Marrone/ Brown
Archival Ink
Marker nero/Black Marker
Spatola/Spatula
Spruzzino per acqua/ Water Sprayer
Pennello piatto/Flat Brush
Pennello punta fine/Fine tip Brush
Pennello da stencil/Stencil Brush
Garza/Gauze
Cordino bianco/White String
Chiave in metallo/Metal key charm
Cartone di recupero/Cardboard
Ritagli di carta/Paper scraps
Forbici/Scissors
Embosser/Heat Tool
Dal Paper Pad 'Herbarium Collection'
(SBBL29) ho scelto una pagina di mio gusto, quella con i
papaveri, ed ho ritagliato un rettangolo 29x18 cm. Ho tagliato via
gli angoli in alto ed ho fatto un buco nel mezzo per ricavare la mia
Maxi Tag. Per maggiore robustezza l'ho incollata ad un pezzo di
cartone utilizzando la Media Gloss Paste (K3P39) stesa con un
pennello piatto. (Foto 1)
Dal pezzo di pagina avanzato e da una
pagina di un vecchio libro ho ricavato delle strisce di varie
dimensioni e le ho incollate sovrapponendole in alcuni punti per dare
più texture. (Foto2)
From 'Herbarium Collection' Pape Pad
(SBBL29) I have chosen a page, the one with the poppies and
cut it to 11 ½ x 7 inches. Cut the corners and poked a hole in the
middle to have a Mega Tag shape. To give it more sturdiness I glued
it to a piece of cardboard using Media Gloss Paste (K3P39)
with a flat brush. (Photo 1)
Using scraps of paper (I have used
what was left from the page and a book page as well) I cut them in
strips and glued them down, overlapping a few here and there, for
more texture. (Photo 2)
Ho passato uno strato di gesso
trasparente e poi ho coperto la Tag con l'acrilico Allegro Bianco
(KAL11) molto diluito. Ho asciugato ed utilizzando lo Stencil
per Mixed Media Rete Ondulata (KSTD011) ho steso la Crackle
Paste Bianca (K3P37) con l'aiuto di una spatola. Adoro questa
pasta...si asciuga in modo molto rapido formando una miriade di
crepe. (Foto 3)
Sempre per aggiungere Texture e
movimento al tutto ho incollato alcuni pezzi di Merletto
(NSP02)...(Foto 4)
I gave a coat of clear gesso and
then covered the entire Tag with a heavily diluted Allegro White
Acrylic paint (KAL11). Dried everything then using Mixed Media
Stencil Wavy Mesh (KSTD011) I spread White Crackle Paste
(K3P37) with a spatula. I love this paste...dries very fast
creating a gazillion of beautiful cracks. (Photo 3)
Added also few strips of Lace
(NSP02) to build up layers...(Photo 4)
Ed ora...divertiamoci con i colori! Ho
iniziato a spruzzare dall'alto verso il basso, lavorando in modo
prevalente sulla parte destra. Ho utilizzato prima l'AquaColor
Turchese (KAQ018), ho diluito spruzzando acqua per far
scendere il colore sulla Tag, ed ho asciugato. Poi ho spruzzato il
colore Acquamarina (KAQ015), diluito ed asciugato. Ho
continuato con questi due colori fino ad essere soddisfatta, poi ho
aggiunto il colore Cuoio (KAQ004) sulla parte in alto della
Tag e sulla parte in basso...sempre sulla zona in basso ho spruzzato
il colore Rosso (KAQ009), diluito ed asciugato.
Infine ho fatto cadere delle gocce dei
vari colori ed asciugato bene. (Foto 5)
Con un pennello da stencil asciutto ho
prelevato un po' di colore Bianco (KAL11), l'ho scaricato su
di un pezzo di carta e l'ho steso sul pizzo, poi ho aggiunto il
colore diluito sulla parte sinistra della Tag, per dare un po' di
luce. (Foto 6)
And now...let's have fun with
paints! Started spraying from the top towards the bottom, working
mostly on the right part of the Tag. Used first Turquoise AquaColor
(KAQ018), sprayed with water to make the color 'run' on the
Tag, and dried. Then used Aquamarine (KAQ015), more water and
dried. Continued with these two colors until satisfied, then moved to
Leather (KAQ004), on the top and the bottom...when dry I
sprayed the color Red (KAQ009) on the bottom too, added water
and dried.
Then I flicked few drops of the
above colors and then dried with my heating tool. (Photo 5)
Using a Drybrushing technique added
some White Acrylic paint (KAL11) on the lace, then added the
thinned color on the left side of the Tag, to give it some light.
(Photo 6)
Adesso è il momento degli
abbellimenti...Dal Paper Pad 'Herbarium Collection' (SBBL29)
ho ritagliato un paio di etichette, poi usando un biglietto con
apertura ovale dal set SBC04 come base, ho stampato con
inchiostro nero alcune immagini usando il timbro High Definition
Butterflies and Tags (WTKCC65). L'apertura con l'ovale l'ho
tenuta da parte...
Ho ripassato i bordi delle varie tags
con lo Stamp Pad Senape (WKP30P). (Foto 7)
Ho ritagliato le due immagini delle
farfalle, di una ho tenuto solo le ali. Poi le ho colorate stendendo
prima un velo di AquaColor Pino (KE34A) con un pennello a
punta fine, asciugato e sempre con il pennello ho prelevato del
Turchese (KAQ018) direttamente dalla bottiglietta ed ho
colorato la parte centrale delle ali. Poi con il Bianco (KAL11)
ho messo in evidenza i 'punti bianchi' sulla parte esterna delle ali.
(Foto 8)
Now it's time for the
embellishments...From the 'Herbarium Collection' Paper Pad (SBBL29)
I fussy cut a couple of tags, then using a 3 Folds Card with oval
opening from the set SBC04 as
a base I stamped with black archival ink few images using the High
Definition Stamp 'Butterflies and Tags' (WTKCC65).
I set aside the part with the opening...
Painted
the tags' borders with the Mustard Stamp Pad (WKP30P).
(Photo 7)
I
fussy cut 2 Butterflies, of 1 image I just kept the wings...then
painted them first with a thin layer of Pine AquaColor (KE34A)
using a fine tip brush, dried and dipped the same brush in the
Turquoise bottle (KAQ018) and painted the wings in the
middle. With White (KAL11) I painted the 'white dots' on the
wings (Photo 8)
Dalle 'Wooden Shapes – Herbarium'
(KLSP031) ho scelto il papavero...ovviamente...l'ho coperto
con la Crackle Paste (K3P37) usando le dita, ho lasciato
asciugare, poi con un pennello punta fine ho colorato il fiore con
AquaColor Rosso (KAQ009) ed il resto con il Turchese (KAQ018)
poi con un marker nero ho accentuato il centro ed infine ho steso la
Patina Anticante Ombra (K3P16M), togliendo l'eccesso con un
pezzo di carta. (Foto 9-10)
From 'Herbarium – Wooden Shapes'
(KLSP031) I picked the Poppy...of course...covered with
Crackle Paste (K3P37) using my fingers, let dry then with a
fine tip brush painted the flower with Red AquaColor (KAQ009)
and the rest with Turquoise (KAQ018). With a black marker I
enhanced the middle of the flower and finally used the Shadow Aged
Looking Patina (K3P16M), getting rid of the excess with a
paper towel. (Photos 9 – 10)
Vi ricordate dell'apertura ovale del
biglietto? Ho ritagliato tutto intorno all'apertura per ricavarne una
cornice, poi con la Colla a Punta Fine (DC09) ho disegnato un
motivo a zig-zag lungo l'ovale, ho fatto asciugare e poi ho colorato
con Allegro Rame Metallico (KAL117). Ho steso la Patina
Anticante Ombra (K3P16M), ho tolto l'eccesso e poi con le dita
ho steso poco Verde Brillante (KAL31) per simulare la patina
della ruggine. (Foto 11)
Do you remember the oval opening
from the card? Well...I fussy cut all around the opening in order to
have an oval frame, then using the Fine Tip Glue (DC09) I drew
a zig-zag pattern all around, let dry then painted with Metallic
Copper (KAL117). Used the Shadow Aged Looking Patina
(K3P16M), getting rid of the excess, and added few touches of
Shiny Green (KAL31), using my fingers, to show some 'rust
patina' (Photo 11)
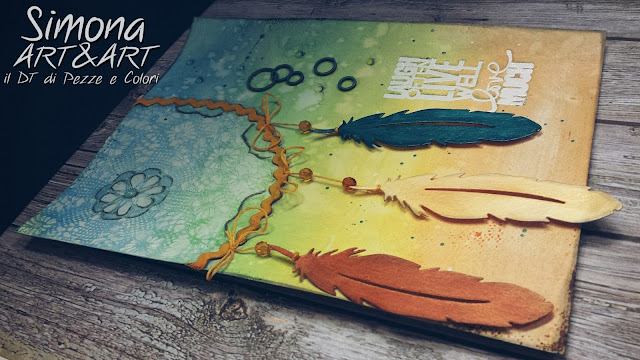
E' arrivato il momento di incollare il
tutto!!!
Iniziando dall'alto ho incollato una
piccola serratura di metallo dal set 'Locks' (SBA35) con la
Media Gloss Paste (K3P39). In alto a destra ho aggiunto un
pezzo di spago bianco e della garza e sopra a tutto ho incollato la
farfalla, facendo aderire solo la parte centrale. Sopra al corpo ho
attaccato un charm in metallo a forma di chiave che avevo da tempo in
casa.
Ed ora il focal point principale...ho
prima dipinto le tag con il colore Pino (KE34A), poi le ho
incollate leggermente sovrapposte. Ai lati ho incollato le ali ,
sopra alle tags ho incollato dei pezzetti di garza e del Filo cerato
Rosso (FLFCR), poi la 'cornice' anticata ed infine il
Papavero.
Con il timbro Crackle (WTKCC39)
ed inchiostro marrone ho aggiunto delle timbrate qua e là ed ho
ripassato tutti i bordi con lo Stamp Pad Senape (WKP30P).
Ho usato il timbro 'Love Life' (WTK117)
per timbrare le parole che volevo aggiungere alla Tag, le
ho ritagliate, ho ripassato i bordi
con lo Stamp Pad Senape (WKP30P) e le ho 'mattate' sul
Cartoncino Rosso (SBU051). Ho utilizzato dei ritagli di
cartone come spessore ed incollate con la Media Gloss Paste (K3P39).
Ho aggiunto dei tratti tipo 'stichery' con un marker nero, del Filo
cerato Rosso (FLFCR) attraverso la serratura e la nostra Tag è
terminata!
Time to assemble our Tag!!!
Starting from the top I glued a
small metal lock from the set 'Locks' (SBA35) using Media
Gloss Paste (K3P39). On the right added some white string and
gauze, then attached the butterfly, only the main body and on top of
that added a small metal key I had in my stash.
Now for the main focal point...first
added a wash of Pine paint (KE34A) on the small tags, then
glued them slightly overlapping each other. Attached the wings, on
top of the tags added some gauze and Red Waxed Thread (FLFCR),
then our 'aged frame' and finally the Poppy.
Using 'Crackle' Stamp (WTKCC39)
and brown ink added few cracks here and there then painted the
borders of the Tag using the Mustard Stamp Pad (WKP30P).
I have used the Stamp 'Love Life'
(WTK117) for my Sentiments, cut them, aged the borders with
Mustard Stamp Pad (WKP30P),
glued them onto Red Cardstock (SBU051) and added to the Tag,
using some cardboard to raise them a little and Media Gloss Paste
(K3P39). Added some 'stiches' with a black marker as final
touches and some Red Waxed Thread (FLFCR) through the
key-hole...our Tag is done!
Ringrazio ancora
STAMPERIA per il
materiale fantastico e questa incredibile opportunità!
Spero vi siate divertiti a seguire
questo tutorial...ci vediamo alla prossima!
I thank once again STAMPERIA for
these awesome goodies and amazing opportunity!
Hope you enjoyed this tutorial...see
you next time!
Kisses&Hugs!
Simo.